Ever had a painting start off so badly you wanted to cry and burn it to the ground?
Well, that’s what happened with me and my attempt at this watercolor-inspired pop art portrait painting.
Yeah, I know what you’re thinking…
Watercolor AND pop art together? That sounds….like a goddamn car accident waiting to happen. What are you even thinking, Amanda?!

Yes I know – but I was curious to give it a shot. Plus, I had gotten these really cool watercolor brush pens from Arteza and I soooo badly wanted to use them.
Read More: Are Arteza Premium Acrylic Paints Worth the Money?
And given my new found obsession with abstract portrait painting, it was only a matter of time before I put these two things together.
So let me start off by saying this…
If you’ve been a long time reader or subscriber of The Buzzed Artist brand, you know we deal with acrylic paint and acrylic accessories.
But when it comes to watercolors, I have little to no experience.
I think I used them once for my Art Studio class in high school over 15 years ago (yikes!) and I wasn’t the biggest fan of it.
(That could’ve also been because my art teacher was kind of a loose cannon but that’s a story for another time)
My point is…put a watercolor brush in my hand, I will have NO idea what I’m doing.
But! I wanted to try new things – new mediums, new styles, and see how far I can push my sanity beyond the breaking point. Because, that’s what we do to get better as artists. We push the envelope and try really scary shit- and be OK with the idea that it might turn out like shit. All for the sake of learning.
With that being said, let’s dive into this messy creative process – watch my creation process here or continue reading
Disclaimer: some links used in this post are affiliate links, which means I’ll earn a small commission if you purchase using my links at no extra cost to you. I only recommend products I think will be helpful to you and bring you one step closer to creating beautiful acrylic masterpieces!
Step 1: Blocking in Color with Watercolors
So to begin, I experimented with these brush pens from Arteza using watercolor paper to try and get a handle on the situation and see how these things worked. I really liked the feel of the brush nib on the paper – almost like I was doing some delicate calligraphy or writing a scathing review about exposed ankles like a Medieval critic.
…or something like that.
Once I got a little more comfortable, it was time to do some artwork – I had this line drawing I prepped and transferred onto watercolor paper…
Filled with hope and slight over-confidence, I began laying down my colors….and my laying down, I mean creating every sort of blotch, water stain, and weird discolorations any amateur with no business in watercolors can do.
Even though it was kind of a hot mess, I was actually kinda enjoying it.
Like, I was marveling at how the ink would slowly spread, creating pretty blends and gradients. I was surprised to see how one section completely changed within minutes once the paper fully absorbed all the liquid I put onto it.
I was fascinated to say the very least. Which kept me going.
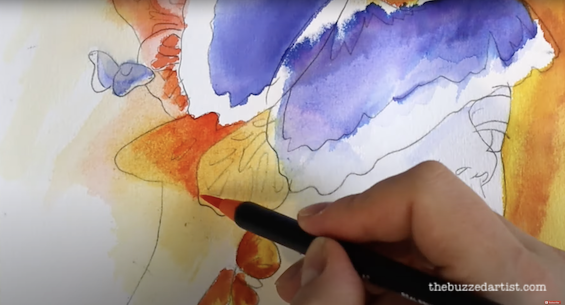
Step 2: Line Work with Brush Pens
Then I decided to try doing some line work – and boy did that look really weird.
Like, I always associated watercolors with subtlety and delicacy whereas pop art is more bold, colorful, and in your face. So seeing these two combined started getting me nervous.
The lines felt too stark. The colors felt too muted. And the more ink I tried adding, the more blotchy the paper looked. This wasn’t acrylics anymore. This is big girl watercolors – and layering was only making it look worse.
So I kept going, diluting the inks with water to give me a not so stark contrast – which was OK, but not exactly what I liked.
I kept adding more colors over dried areas – trying to bring out more bold colors without adding much water…and that seemed to help quite a bit.
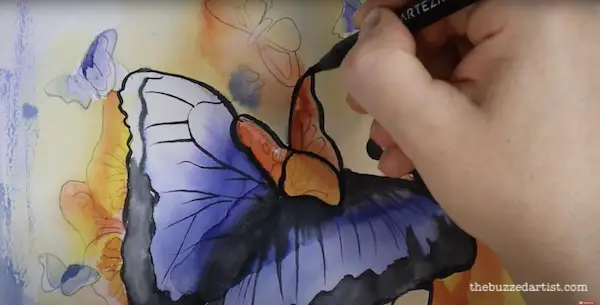
Step 3: Introduce the Acrylic Paint & Markers
I decided it was high time to introduce my titanium white acrylic paint to the scene, and boy was I relieved. Something I was familiar with – knew that worked and wouldn’t splotch on me. I brought out the lightest values of this painting and felt my anxiety loosen with every stroke.
So I got bold again.
I began to add some cool looking shadows to give this character more depth and life – and then grabbed my black everblend marker (3rd medium introduced so far) and began to reinforce my lines. I figured if I want to do pop art, I have to go all in and be OK with the stark contrast. I’ll make it work somehow.
Step 4: Throw in Colored Pencils
I suddenly got the idea of using my Prismacolor colored pencils to add more color and vibrance. And wouldn’t you know, it worked like a charm. We are officially in the realm of mixed media baby!

I was creating gradients, adding yellows and oranges and stark purples where I couldn’t with my watercolors – I felt the adrenaline coursing through my fingers as I started laying down color after color.
Now it’s play time. I’m talking scribbles, squiggles, random lines wherever I wanted them.
I’m talkin’ white outlines with the help of my Arteza white paint pen, creating additional contrast, and the occasional geometrical shape for more variety and looseness.
Read More: Are Arteza Paint Pens Really Any Good?
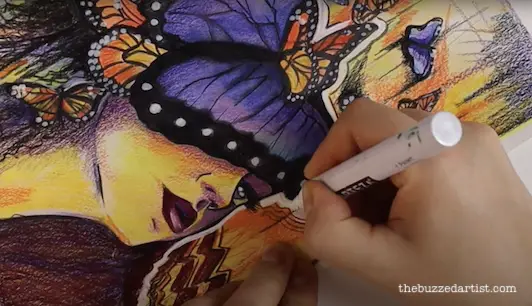
For even more color, I played with the facial colors, creating magentas and pinks for shadows and oranges and yellows for the highlights…..ooo, we are cooking with gas now!
The more lines I added, the more my vision was coming together. And the thing I was feeling inspired to create was hair – an explosion of lines that add movement, spontaneity, and a truly abstract vibe that I was craving.
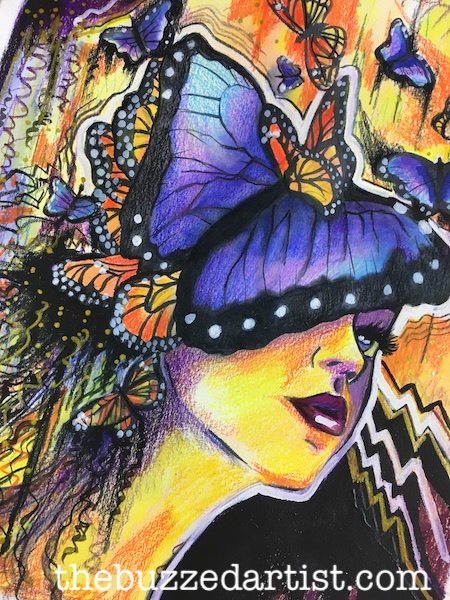
Step 5: Adding Embellishments & Contrast
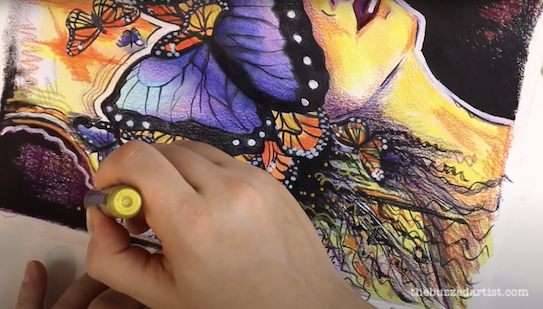
I knew I needed something for deeper contrast, and I knew there could be only one medium that would answer the mail – mars black acrylic paint. It was the missing piece of the puzzle that rescued me and cleaned up some little mistakes here and there
And it wouldn’t be me without some shiny embellishment – I went with this gold metallic acrylic marker from Arteza that helps accentuate some lines, add little details to the hair and some cool dots for added splendor.
Read More: Are Arteza Acrylic Markers Really All That?
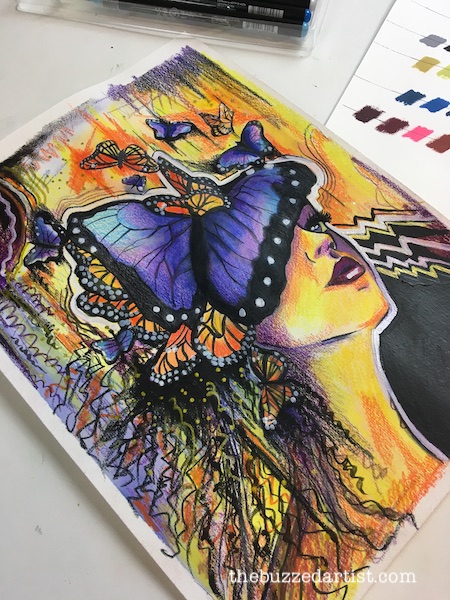
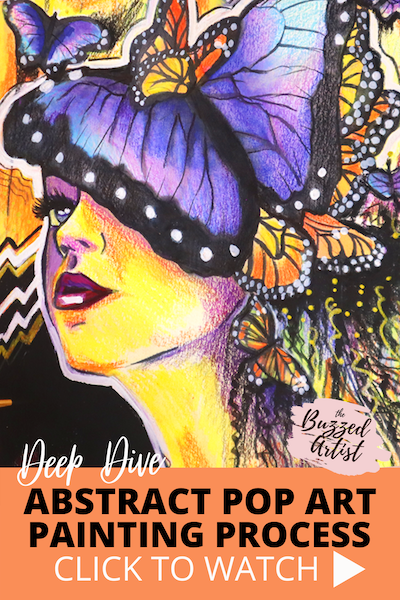
Once I put the finishing touches to my work, I was extremely pleased to see how gorgeous it turned out (much to my relief).
Concluding Thoughts on Painting Mixed Media Pop Art Abstracts
If there is one thing I learned from this process, it’s being OK with not knowing the final outcome. I was completely unsure on how I wanted to do this painting, let alone what colors I wanted to use.
And that is actually a testament to playing loose – allowing your art to speak to you and free flow in spontaneity. It’s freaking scary and terrifying…but it’s also one of the most exhilarating feelings I have come to experience from any painting I have done.
If you are looking to loosen up your painting style, welcome in new creative ideas and mediums, really consider throwing away the perfectionist and try abstracts. Combine mediums you like and are unfamiliar with; mix and match and stretch beyond your comfort zone. You may be very surprised at what you may discover at the end.