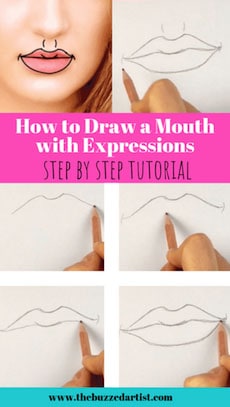
A simple step-by-step approach to drawing mouth and lip expressions for beginners
[cp_modal id=”cp_id_9a74a”] [/cp_modal]
Some links used above are affiliate links, which come at no extra cost to you, my wonderful Queen Bee! If you want to support my channel, simply click the link!
Supplies Used
Learning to draw the mouth and lips is a great way to master creating facial profiles and harnessing the power of capturing emotions.
Plus, it’s a pretty fun way to practice all sorts of mouth shapes! So, with that being said, what I like to do when drawing the mouth is first…..
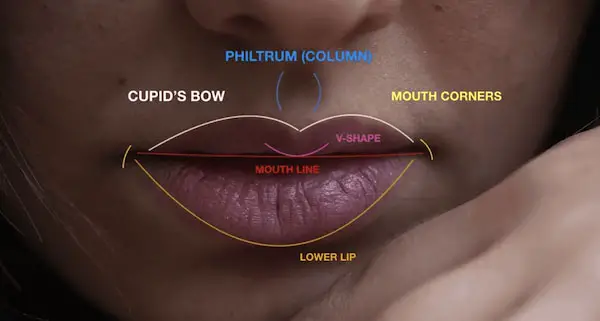
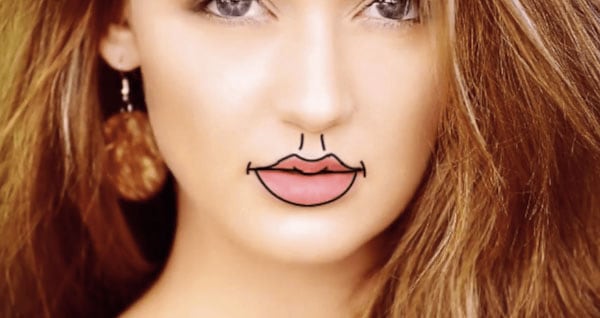
Understand the Lip Anatomy
If you are familiar with my madness, I like to first understand and break down what it is I am looking at in my drawing subjects. Doing this helps me see lip construction as a building block in my drawing process and if something looks off, I can refer to the lip anatomy to check myself.
soooo yeah, it’s kind of a big deal.
Alrighty, the lips.
There are a few major components to the lips we need to first recognize and they include…
- the cupid’s bow (aka the top of your top lip)
- mouth corners
- v-shape (the bottom portion of your top lip)
- mouth line, lower lip
- the philtrum (aka the little dent area of skin between the top of your lip and nose).
Aight, we got the lip anatomy down. Cool. Now what?
Well, the next step is to do one of my most favorite drawing techniques of all time….
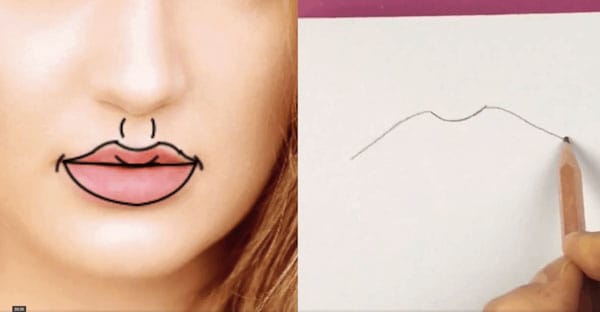
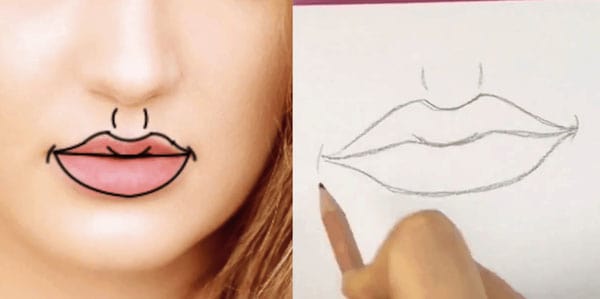
Step 1: Breaking Down the Shapes
Firstly, I grabbed a reference model picture to create my lip drawing. Reference pictures are super super uber important, especially when you are just getting started with drawing and recognizing patterns. Don’t let your ego, or other snobby artists, tell you otherwise! Trust me, use reference pictures!
Anyways, in this reference picture, I first marked out the major anatomy components of the lips (as we learned above), and drew it right on top of the reference picture. Sure it looks a bit funny, but we’re learning, and that’s important to note!

[cp_modal id=”cp_id_9a74a”][/cp_modal]
Step 2: The Drawing Process
Now comes the fun bit, drawing.
Ok, now that you’ve broken the lips down into their fundamental parts – and shapes – you just simply draw exactly what it is you see!
With your pencil and sketchbook, begin first by drawing in the cupid’s bow. Remember, draw what you see!
then, draw in your mouth corners.
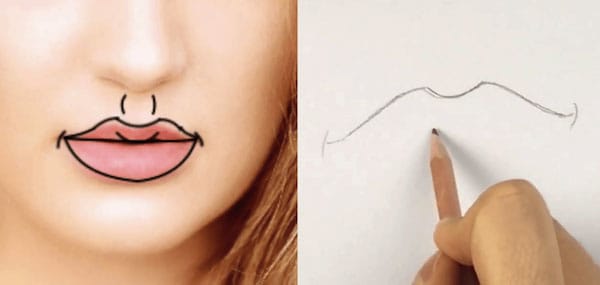
Add in your v-shape and then the mouth lines, which connect perpendicular to the mouth corners.

Then, add in a sweeping “U” shape line to represent the bottom portion of the bottom lip, connecting them perpendicularly to the mouth corners.
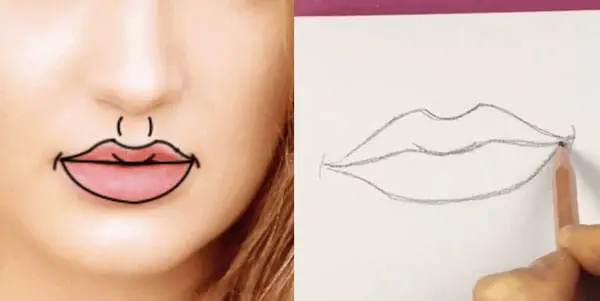
Last but not least, add in the philtrum lines.
and there you have it. You just made a relaxed, typical lip expression. That wasn’t so intimidating, was it?
Of course, you may not get this on the first try, and that is OK. It took me many moons to understand this technique of breaking things down and drawing them in, but once I got the hang of it, my drawings got drastically better and took me less time to do.
Learning to break down these shapes will enable you to draw many different types of mouth expressions, simply because you are seeing the lip construction in a simpler, more manageable way.
So what are you waiting for? Get practicing!
What did you think of my drawing tips? Are they helpful? Comment below and share your thoughts!