

Simple steps to paint a giant wall mural at home to add pops of color and creativity to your space
Wall murals are one of the coolest ways to incorporate large scale art to a space, in this case, to my daughter’s bedroom. I wanted to add a huge pop of color to her space (plus, I wanted to tap into some serious Michelangelo vibes) and something within just screamed- giant ass wall mural painting.
I’ve always been fascinated with this art form, but never ventured to try it BECAUSE it is so massive and can’t be stashed away in a closet if I hate it. No, a mural requires a bit of commitment and a good deal of planning to make it go smoothly from the start. So, here are the steps I took to plan out, design, and paint my giant wall mural from scratch.
Disclaimer: some links used in this post are affiliate links, which means I’ll earn a small commission if you purchase using my links at no extra cost to you. I only recommend products I think will be helpful to you and bring you one step closer to creating beautiful acrylic masterpieces!
Supplies for Making your Own Giant Wall Mural
Tools
- Ruler
- Cardboard
- Box Cutter
- Pencil & Eraser
- Level
Materials
- Latex Paint (Benjamin Moore Regal Select Paint + Primer)
- Acrylic Paint (Arteza outdoor acrylic paint)
- Paint brush (Corona 2.5 Tynex/Orel Brush)
- 3/8″x 9″ Microfiber Roller and extender stick
- Frog Tape
- Plastic cups
- Stirring sticks
- Dropcloths
Time: 2-3 days (for prep, paint, and drying time)
Step 1: Design the wall mural painting
The first step in any painting, big or small, is planning the design out. Unless you’re willing to gamble and go into a mural painting without a clear idea of what you want (which is super hard if you’re even remotely a perfectionist), planning is crucial and a great way to figure out a design that suits your style and space best.
Where to get ideas for a wall mural
If there is one place I always go for inspiration and ideas, it’s Pinterest. It’s a literal treasure trove of mural eye-candy, and I totally found some great ideas doing it this way.
Before I dove into design, I made sure to do the following:
1. Know who is the room for and/or the general purpose of the room
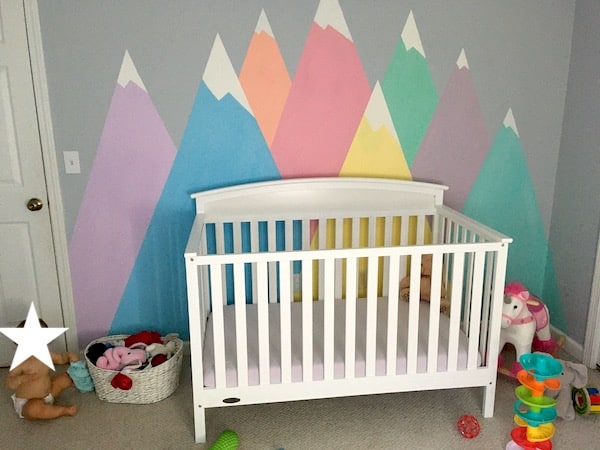
I am making this mural for my infant daughter in her bedroom, and I wish to promote an atmosphere of calm yet playfulness. I mention this because when creating a mural, think about the space and who it’s for and/or how they wish to feel within that space. If you are intending to use that space for crafting/creativity, find colors like violets, oranges and sky blues that communicate the message. If it’s a bedroom, using blues and grays provides a calming atmosphere.
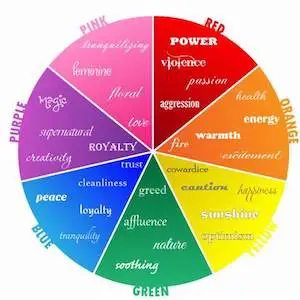
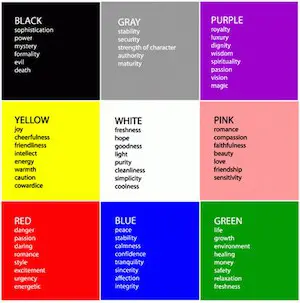
—> Slap this to check out some helpful color psychology charts
Because I was painting a mural for my daughter’s bedroom, I wanted a neutral gray-blue color (Benjamin Moore’s Sweet Innocence). This went very well with color psychology of a calming atmosphere for leisure and sleep. I also wanted pops of color to get a more playful atmosphere without it being too overwhelming to the senses – perhaps some pastels.
2. Think about the background first, foreground second.
A lot of color planning went smoothly because I chose a wall color first and then designed/chose colors based off the wall. Because I chose this laid-back, toned down background of gray-blue, I then proceeded to search for the foreground of the mural – aka the main subject of the mural itself – and make a design that adds a pop of contrast, particularly with pastel (aka candy) colors.

Hot tip: if you’re not sure what color will go best with your space, Benjamin Moore has a great app that lets you snap a picture of your space and change colors using their paint collections. Even if you don’t go with their brand, this is a GREAT virtual way to figure out what colors you are leaning towards and then head to the paint store to grab some samples. It saves some time and energy, which is a treasure when painting a mural.
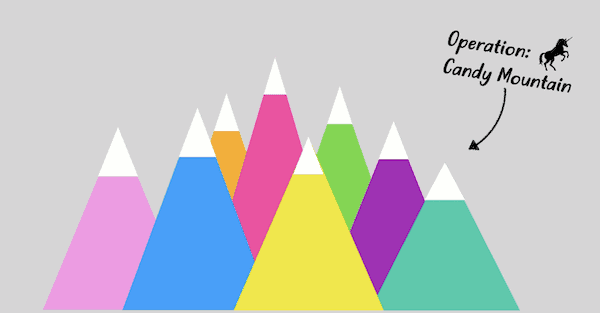
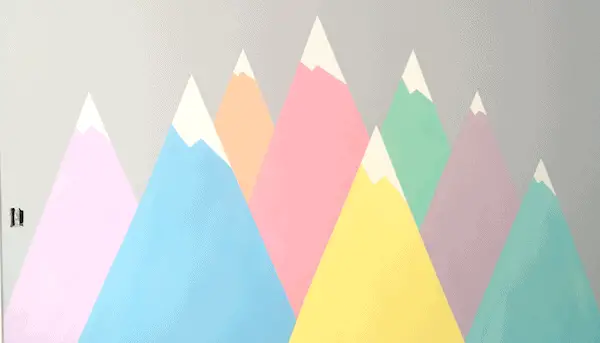
So once I figured out my color scheme, I went looking through Pinterest and found something that was both easy to replicate and incorporated my color scheme perfectly – mountains.
Step 2: Gather your paint supplies
So now that you got your color scheme and main subject picked out, it’s time to gather the paint supplies- ranging from brushes to paint colors.
What Kind of Paint can I use for the Giant Wall Mural?
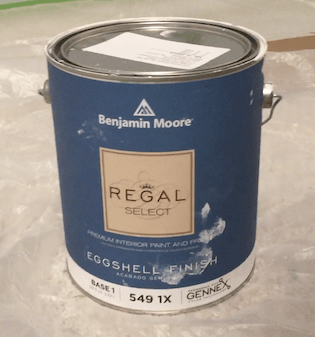
When it comes to paint, there are plenty of options- from oil to enamel to latex to acrylics. All of them should be fine to use (make sure they are interior!), but you should always read the paint can to see where and how they should be used. Because I am a big Benjamin Moore fan, I went with their white premium interior latex paint as my base and Arteza outdoor acrylic paint for my colors.
Note: I opted for latex paint because of the low VOC emission and quicker drying time. If you prefer oil paint, be sure to factor in proper ventilation and an extra 2-3 days for drying time.
What kind of paint finish should I get?
When painting indoors, I usually recommend getting paint finishes that are much more flat in sheen – like a matte, satin, or eggshell. These finishes are the most forgiving on your walls and won’t reveal as many wall defects (unlike glossy paint which will bounce the light off the walls back to your eye, thereby picking up on all the imperfections).
Can you use acrylic paint on walls?
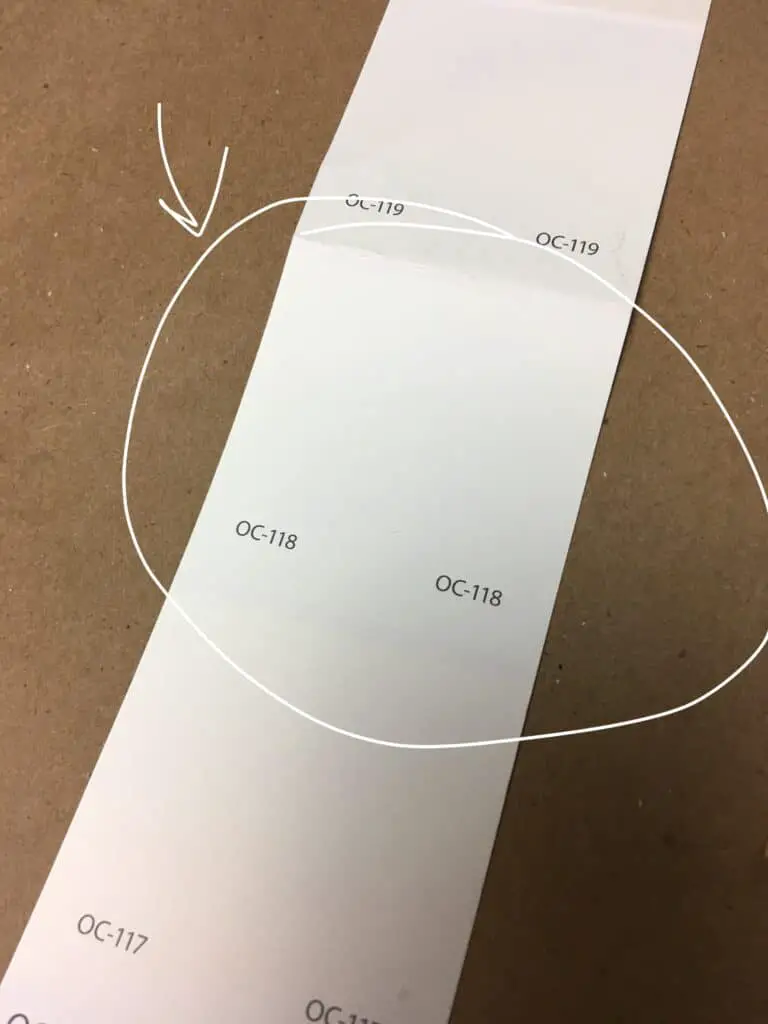
Yup, acrylic can be painted on the wall, but unlike latex, it is much more expensive in larger quantities (especially if you’re looking to paint a whole wall). So you can either go all out and buy multiple pint cans of a certain latex color, or use a white latex paint as a base and mix in acrylic paint to get the desired color you are looking for. Because I am going for a pastel set of colors, I used the Benjamin Moore Regal Select Snowfall (OC-118) white paint mixed with various acrylic colors.
What kind of brush or roller should I use to paint a mural?
This was a big question for me so after some research, I came to a few conclusions:
When it comes to painting large areas (aka the background), I will use a 3/8″x9″ microfiber roller with stick extender. However, I changed this strategy when it came to the actual design portion. I originally opted to use microfiber mini rollers for the design portion of the mountains. But after trying to paint with it, it just wasn’t my cup of tea.
I switched over to my Corona Tynex & Orel Professional Cortez 2.5 brush (a brush I have used for practically every paint project from wall to furniture painting) and gave it a whirl for painting the mountains; this brush kicks mucho butt.
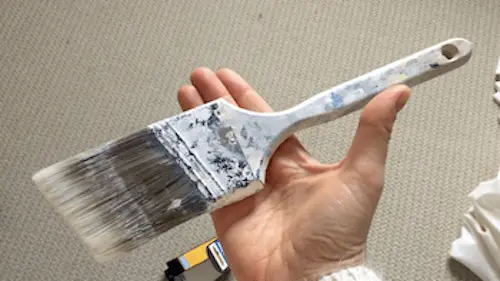
I can create smooth paint marks that blur away the brush strokes and navigate tight corners and edges without really skipping a beat. If there is one thing I highly recommend any DIYer looking for a good quality paint brush – the Corona brand brushes are magnificent.
Step 3: Prepping the Wall
So you got your paint supplies. Now it’s time for the least fun, unsexy part of all this…. prepping your wall.
If you’re thinking that you can skip steps 1-3 to get right to the painting part, you’d be dead wrong.
See, your wall needs to be like a canvas. Free of defects and primed to receive paint. It will save you lots of time and your paint supplies (and wallet) will thank you profusely for it. Trust me on this, you do not want to take the easy way out.
Prep Step 1. Clean and wipe down your walls
The first thing you must do is wipe down your walls with a damp cloth to remove any and all years of dirt and debris. If you have fresh drywall, you won’t need to really do this. For those hard to reach areas like ceiling corners, use a broom to knock that filth out.
Prep Step 2a. Check and spackle any wall imperfections to give a smoother finish. Sand once dry.
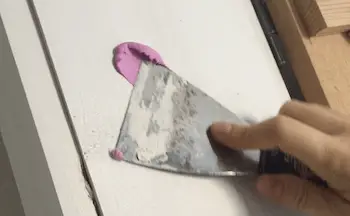
Next, you’ll want to make your walls as free from nail holes and general holes/dents as possible. Doing so ensures your mural painting looks uniform and that you can create straight edges and steady brush strokes with greater ease. Seriously have you ever tried painting a straight line over a dent or dried paint drip? It’s not fun.
Once your spackle has dried (20min – 1 hour), go over it with a light sanding block to remove any excess product. Then, lightly wipe down the area with a damp cloth again. When you are satisfied with your wall, you can move onto priming.
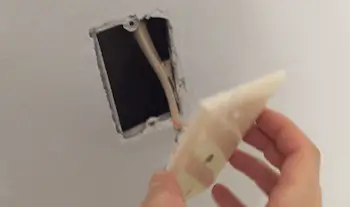
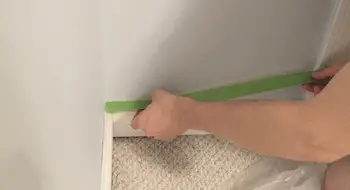
Prep Step 2b. Remove all wall outlet plates and tape down all baseboard/trim
Seriously, it takes 3 minutes but it’s much easier to paint around a hole in the wall as opposed to a plate (plus cleaning paint off those plates is a PAIN).
Prep Step 3. Prime the wall
Most importantly, prime your wall with a latex primer so your actual paint will not absorb into the wall and dull the colors.
Like a canvas that has been expertly stretched and primed to receive paint, your wall must be cleaned, prepped, and primed in order to properly receive the paint and not absorb it straight into the drywall (thereby dishing out more dough to buy more paint). That can get expensive and can create future problems while painting.
You can prime your walls one of two ways:
- Buy a separate primer like KILZ 2 (a bit cheaper, but requires you to paint the walls twice before adding any paint color to the wall)
- Buy paint that already has primer mixed into it. Lots of brands like Benjamin Moore (Regal Select), Behr (Marquee), and Sherwin Williams offer great selections to choose from. Just be sure to look out for “paint + primer” label on the paint can.
Luckily, my mural background paint is Benjamin Moore Regal Select Paint & Primers, so I could just prime and paint on the color straight away (requiring me to do less layers too, woohoo!).
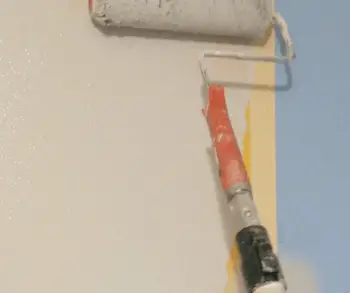
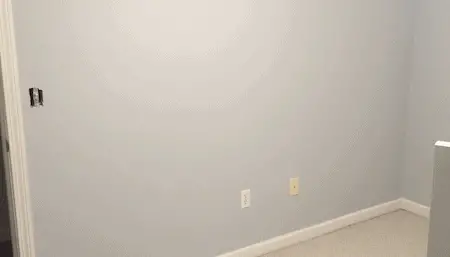
Step 4. Paint the Background color
Once you’ve primed everything, you’ll want to add your background color first, and I opted to use a 3/8″ x 9″ microfiber roller. Like I mentioned before, I skipped priming and went straight to painting the wall with Benjamin Moore Regal Select Paint + Primer. This was such a great time saver.
Because the previous wall color was a bit darker than the new wall color, doing 2 coats of paint was just enough to cover properly (however, I probably could also do 3 coats to really get the full color showing through).
Step 5: From Vision to Reality: Get your Idea on the Wall
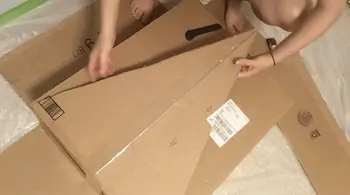
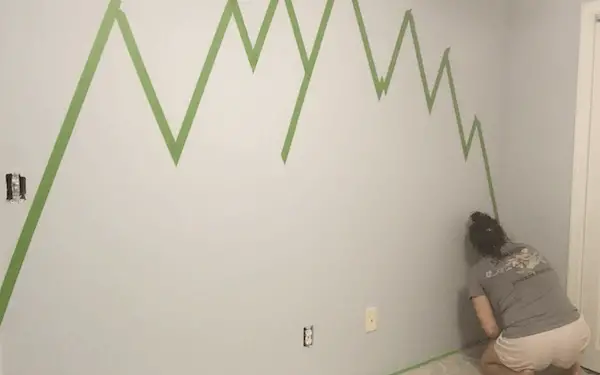
Since I decided to go with mountain ranges that resemble a simple triangular shape, I decided to make a template using cardboard and a box cutter to resemble that shape.
I ended up cutting a triangle, use a level to make sure my triangle was level and not askew to the wall and traced the outline. I did this multiple times, varying the heights of the peaks and spacing them out over the total width of the wall.
Step 6: Paint the wall mural
Now comes the most fun part of them all: painting the foreground of the mural.
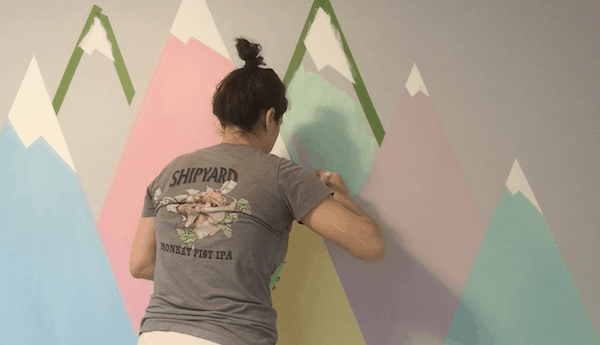
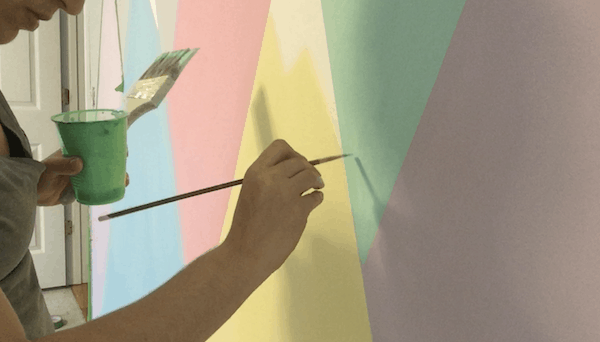
Add different colors into individual cups
Because every mountain peak is a different color, it was much easier to prep and mix the right paint color in individual plastic cups. That way, I can simply take the color cup I want and start painting away. While I wasn’t using them, I would cover the tops with saran wrap to keep the paint fresh and not dry out.
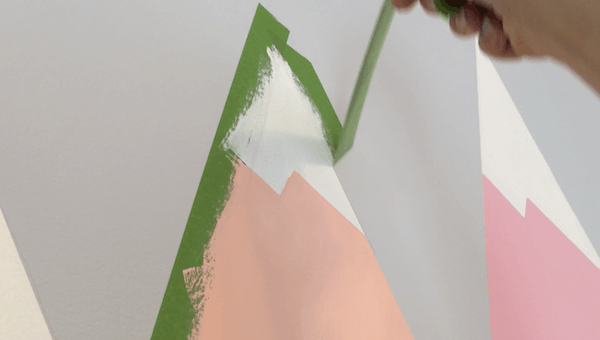
Frog Tape for clean, crisp straight edges
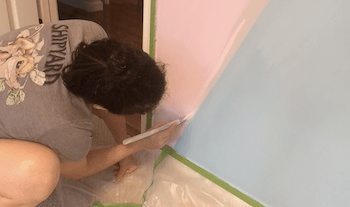
Once your background is dry (24-36 hours later), it’s time to add tape. Because I wanted my mountains to have clean, crisp lines, I decided to use Frog’s Tape and place them along the traced lines of the mountain edges.
Because I wanted my mountains to overlap one another without gaps left from tape, I needed to do a bit more planning on how I would go about painting and taping without a whole lot of hand-touching up.
I decided to tape the foremost mountain peaks first and after painting that particular peak, remove the tape and add tape to whatever peaks were directly behind it and repeat. This was a bit of a paint at first, but such a God-send in the end because it helped me avoid large swaths of missing paint between peaks.
In addition, I also made a zig-zag line at the pointed tips of each mountain peak with Frog Tape. This will later be the border for the snow-caps.
Choose one direction to paint for a uniform look
Whether you opt for a roller or brush, I always recommend choosing one direction to paint on your colors and stick to it. This helps create less random brush strokes. Plus, the way the paint settles onto the wall will be much more uniform and ensures the light will hit it the same way – which basically means you get a more cohesive color block that doesn’t look splotchy or patchy.
For this mural, I decided to paint in a slanted direction from right to left for each mountain.
Once all my colors were blocked in, it was time to add in the snow tips to the peaks, which I painted the same white Benjamin Moore base color. To make sure I avoid the same issue of missing color zones, I removed the zig-zag frog’s tape representing the border of the peaks and proceeded to carefully paint along the edge where the mountain color meets the snow peak with a smaller brush (or if you have an angled brush, tip your brush so the angled tip is at the top and faces away from you at 45 degrees, and slowly follow the line to make a smooth swatch of paint).
Slowly remove all the frog tape and watch those edges – and your mural- come to life.
Step 7: Seal the wall mural
Once you are completely finished with your mural and the paint is completely dry (24 hours), it’s time to seal that puppy up with varnish to make sure the colors and design integrity last for many years to come. Plus, using varnish on your wall mural can really help protect your wall from dirt and water (especially in a high-traffic room or bedroom where spit-up and cracker crumbles abound).
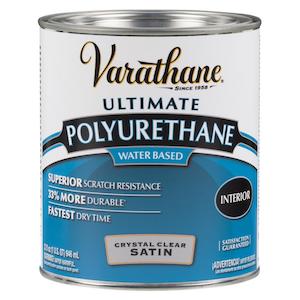
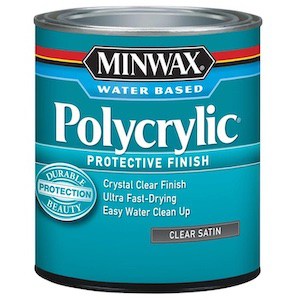
A great varnish option to use is Polycrylic Water-based Protective Finish (Clear Matte or Satin) or Verathane Polyeurathane Sealer.
Now, because I chose and mixed Regal Select Paint (Eggshell finish) and Arteza Outdoor Self-sealing paint, I decided to skip the varnish part. Plus, I am not too concerned with longevity since I have a hunch my daughter will want to change her room color when she is a bit older (as children are wan to do).
And that’s how I went about creating a giant wall mural painting for my home. There were lots of learning moments but it certainly has inspired me to do more large-scale paintings in my home (*eyes the spare bedroom*).
Have you ever wanted to paint a wall mural? Has this inspired you to give a try? Comment below and let me know!


It’s beautiful Amanda. You’ve used an interesting combination of colours, and I’m sure your little girl will enjoy looking at them and talking about them – discussions about colours, mountains, shapes etc. It’s special when anyone makes something just for you, particularly when it’s your Mum.
Thank you so much, love 🙂 It truly was a work of love. I think she enjoys looking at it before taking her naps <3