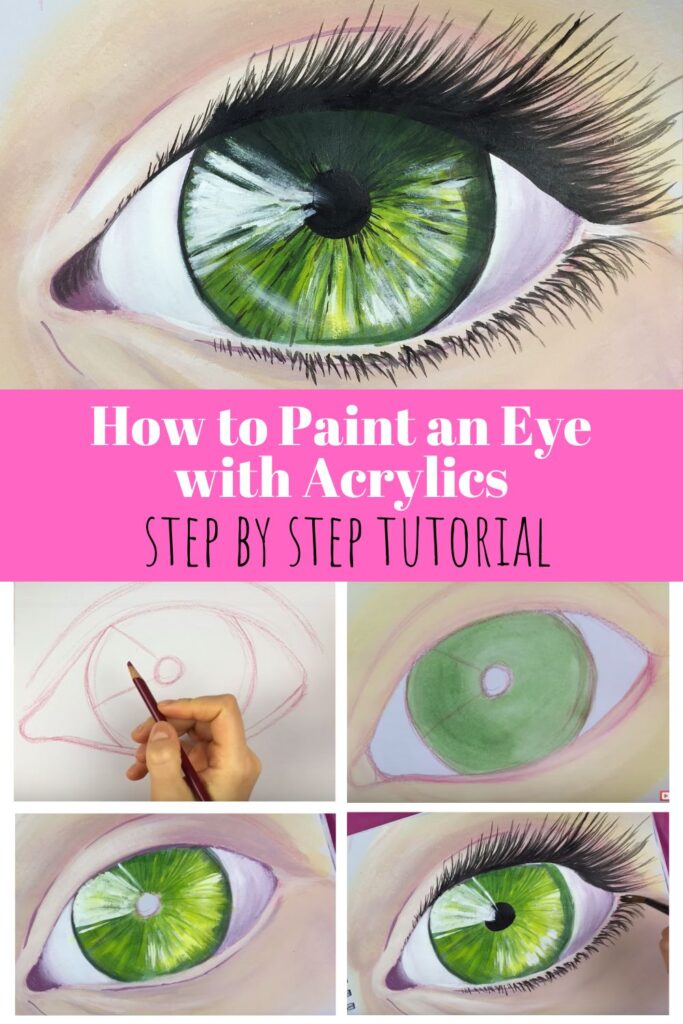
A step-by-step easy tutorial on painting a realistic eye using acrylic paint for beginners
In this post, you’ll learn how to draw every part of the eye, incorporate basic techniques to block in your eye shape, add a base color, create shadows and highlights, and creating fine details for a stunning, realistic looking eye using acrylic paint.
👉 Want to host a paint party with this tutorial? Here is exactly how you can set up a fun DIY paint party at home.
Disclaimer: some links used in this post are affiliate links, which means I’ll earn a small commission if you purchase using my links at no extra cost to you. I only recommend products I think will be helpful to you and bring you one step closer to creating beautiful acrylic masterpieces!
Supplies You’ll Need for Painting a Realistic Eye
- Primed canvas, watercolor paper, or multi-media paper
- Colored Pencil (burnt sienna or light brown will do)
- Reference photo
Paint Supplies:
- Mars Black or Ivory Black Acrylic Paint
- Primary Blue Acrylic Paint
- Titanium White Acrylic Paint
- Unbleached Titanium White
- Primary Red Acrylic Paint
- Cadmium Yellow Acrylic Paint
- A bright color for the iris (I chose this Green Acrylic Paint)
Paint Brushes:
- A Flat Wash brush ( I used ¾” Flat Wash Brush)
- A Flat Shader brush ( I used #10 Flat Shader)
- A filbert brush ( I used this #10 Filbert)
- A small brush for details ( I used #1 Detail Brush)
- A round brush (I used #8 Round)

How to Paint a Realistic Eye with Acrylics Step By Step Tutorial
Follow along with this video or keep reading to create your own realistic eye painting using acrylics.
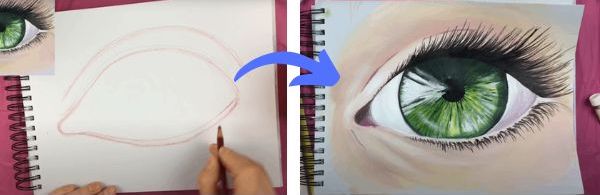
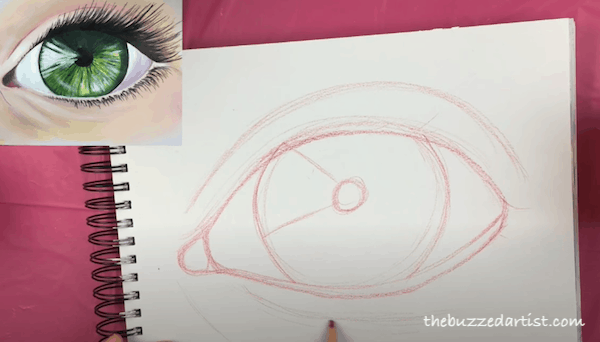
Step 1: Draw in the Basic Shapes of the Eye
Whenever you start any painting, an important part is using a reference photo and drawing out the basic shapes first as a way to plan out your composition and give you a little guidance as you paint. So, let’s begin drawing in the eye socket.
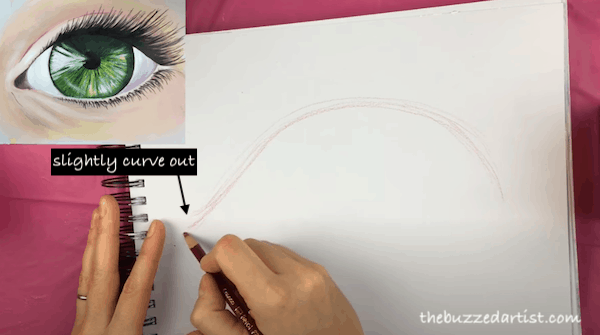
The first step is to draw in the upper portion of the eyeball. Space out about 5-6 inches from the top of your canvas and using a brown or dark red colored pencil, create a downward curved line. I usually leave 3-4 inches of clearance on both the right and left side of the line.
Next, we’ll create the tear duct, which looks like a “c” shape coming out on the left portion of the curve.
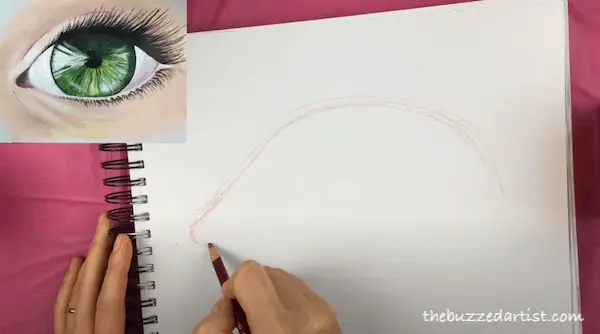
Once you’ve established your tear duct, connect the tear duct to the right portion of the eye line, by creating a curved horizontal line. You’ve just completed your first part of drawing an eye (pat yourself on the back, baby!)
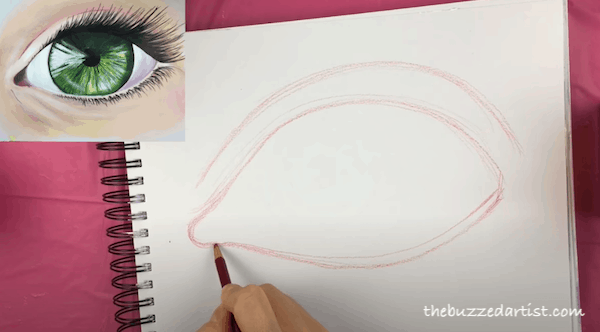
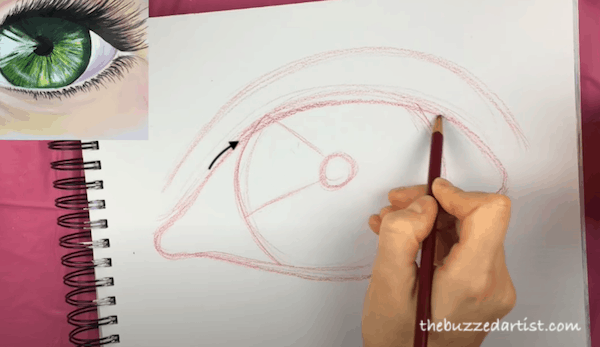
Now it’s time to add in the eye fold, which is simply a curved line about 2-3 inches above the top of the eye. Simply follow the curve of the eye until you reach the other end of the eye.
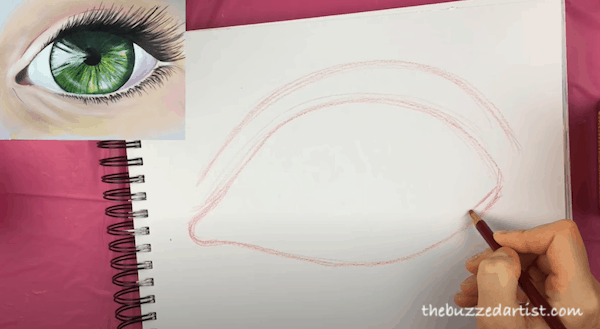
In addition, add a tiny waterline on the lower lid (about 1″). Begin on one side of the eye and follow the bottom line curve and taper the line width to the tear duct.
It’s time to add the iris. The rule of thumb here is that the iris is about 1/2 part the eye width, with 1/4 part space on either side. Draw in two curved lines from the top eye line to the bottom eye line – this will form the edges of the iris.
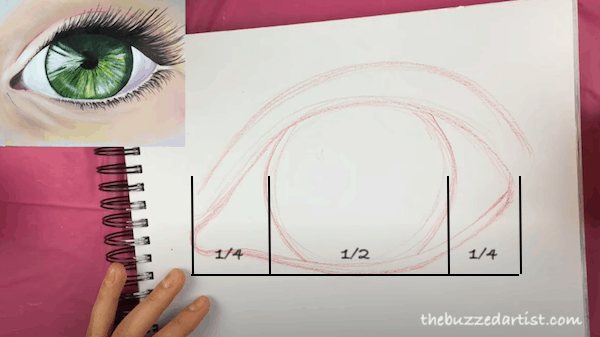
At the center of the iris, add a smaller circle representing the pupil. You can vary the size of the pupil as you see fit.

To help plan out where the eye highlights are, add a sideways triangle with the point centered at the pupil.
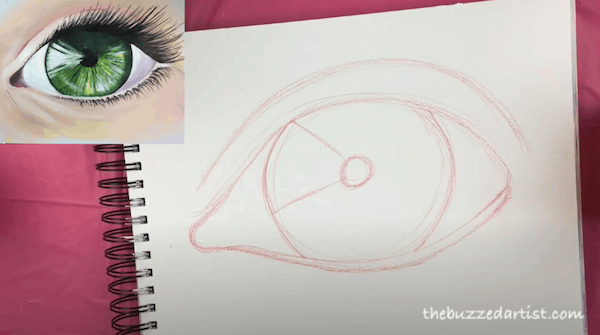
Let’s add in where the lash line will go. Place your pencil about 0.5″ below the top line and follow the curve of the line to the end of the eye line.
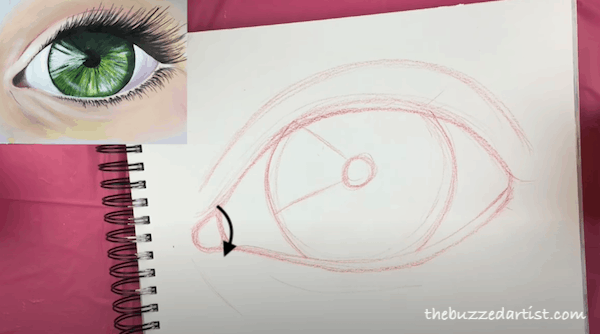
Now, we’ll add a small curved line a few inches to the right of the tear duct. This will create the eye shape boundary (and adds that hint of realism).
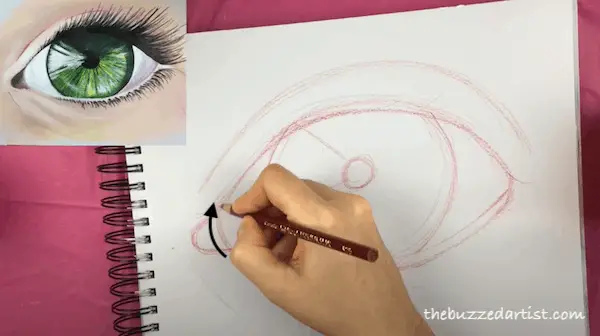
Right next to the eye boundary add another curved line in the opposite direction, forming the tear duct.
Finally, draw a few fine curved lines under the bottom of the eye. This will be used later when we are painting the more detailed parts of the skin around the eye.
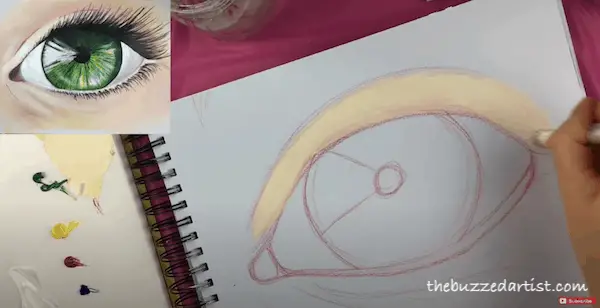
Step 2: Paint in the Skin Around the Eye
Mix unbleached titanium white with a tiny bit of yellow and load it onto your flat brush. Proceed to paint the surrounding skin around the eye, using slightly curved horizontal strokes.
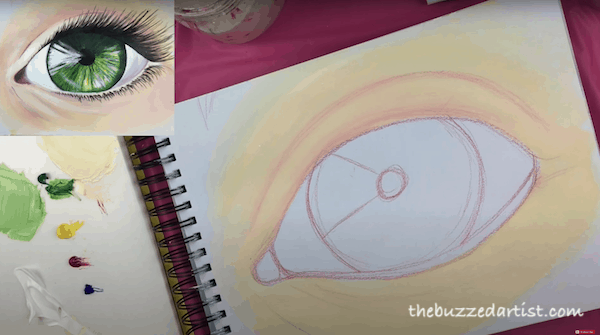
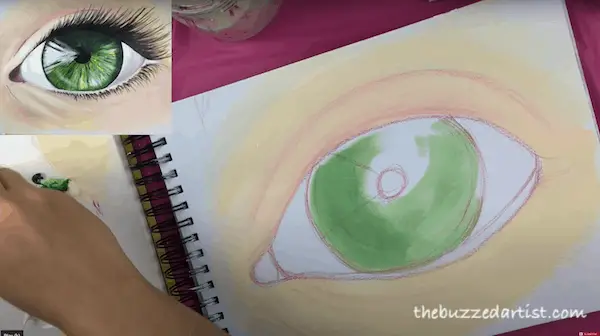
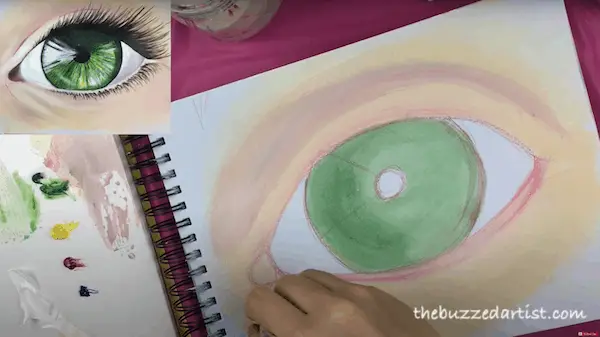
Step 3: Paint the Iris Color
In this step, we’ll be filling in the iris, which is usually a bright color. Choosing the desired color you like, load it onto your rinsed, wet flat wash brush. Proceed to block in the iris color.
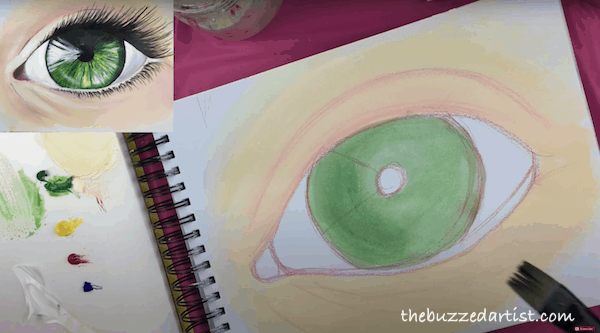
Using a rinsed flat wash and the skin color (unbleached titanium white + a bit of yellow), paint in the waterline of the eye.

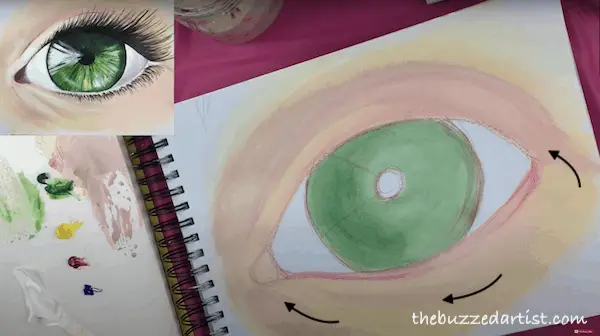
Step 4: Paint the Skin Shadows
Mix together unbleached titanium white, red, blue and titanium white to create a darker skin tone. Using your flat wash brush (un-rinsed), proceed to add curved horizontal strokes along the eye fold area, following the shape of the eye.
Tap your brush into water (but not in paint) and proceed to blend the shadows into the skin color.
Repeat this process for under the eye in several places like near the tear duct and at the eye corners.
Step 4: Paint the Skin Highlights
Mix unbleached titanium white with a bit of white and make sure to load your flat wash brush with a bit of paint (not too much). Proceed to lightly dry brush the color starting from above the tear duct to a bit halfway over the eye flap.
With the same color, switch over to your round brush and add several strokes along the upper portion of the eye as well as under the eye near the tear ducts.
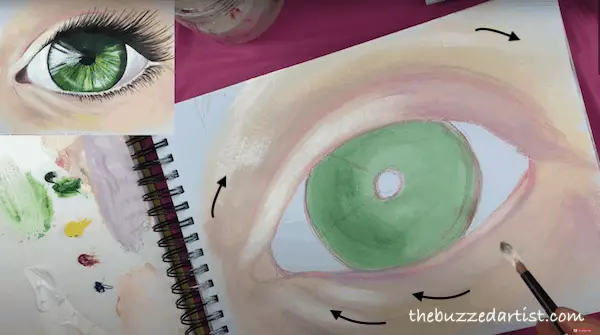
Proceed to add more strokes at the rightmost eye corner as well as the waterline, bringing everything to a point.
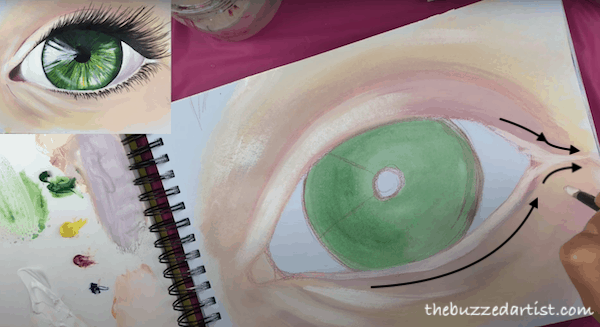
Using your flat wash brush dipped in a bit of water, blend out the skin highlights following the same horizontal curved strokes.
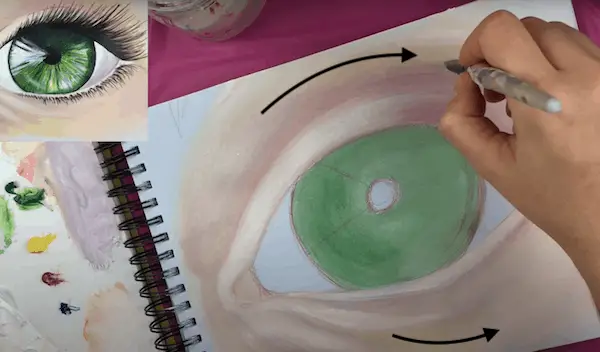
Step 5: Add Eye Ball Shadows
With your rinsed round brush, mix small amounts of blue and red with a bit of white to create a darker shade of color. Then, add the color to the tear ducts and to the rightmost bottom edges of the eye as a dark layer.
With the same brush, lightly add some fine lines around parts of the eye fold and waterline.
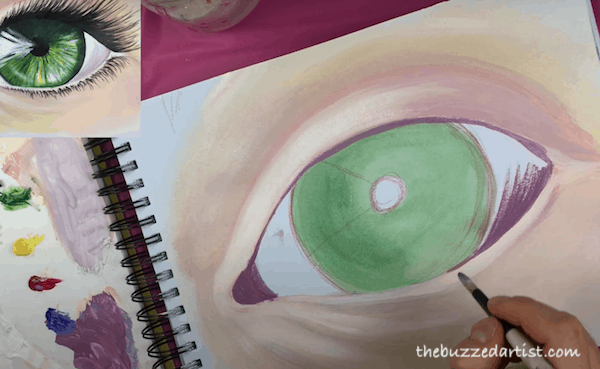
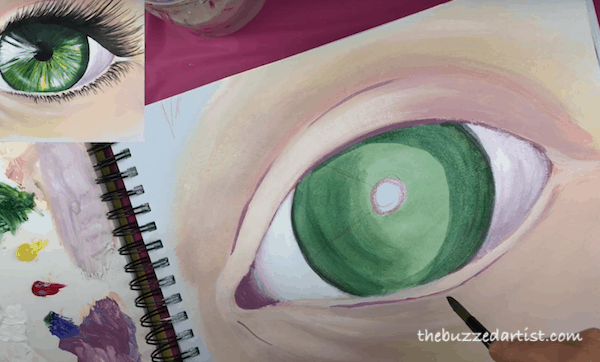
Step 6: Paint in the White of the Eye
With a rinsed round brush dipped in white, add in the whites of the eye. Doing this softens the eye ball shadows to help give it more depth.
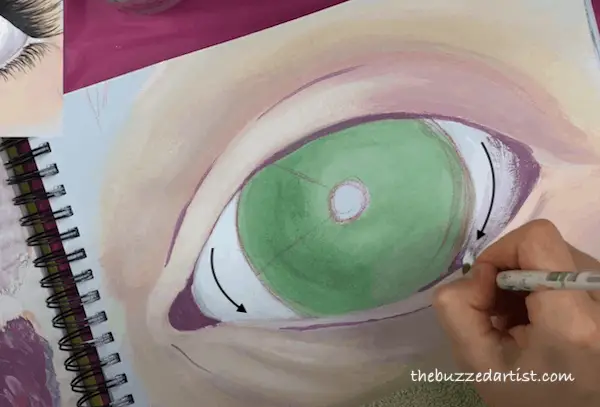
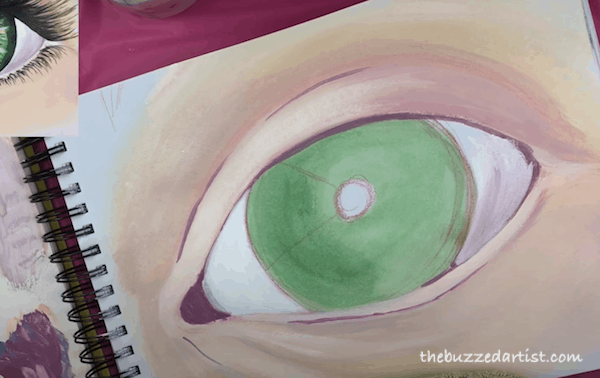
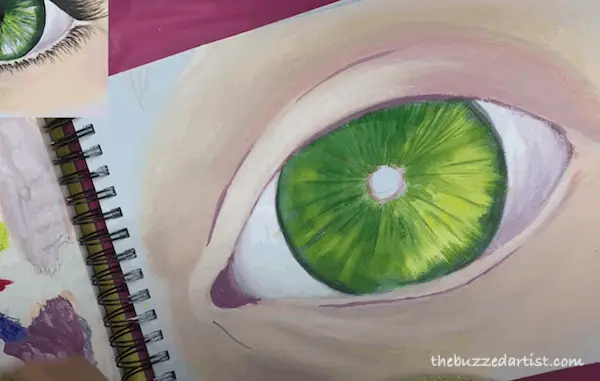
Step 7: Paint in the Darker Parts of the Iris
With a rinsed round brush dipped in green, proceed to add a darker color to the perimeter of the iris.
Take your brush and dip it in water (do not reload with paint). With your brush, go to the edge of the green stroke you just painted and using the brush tip, spread out the color bringing it toward the center of the eye. Repeat this for the other side of the pupil.
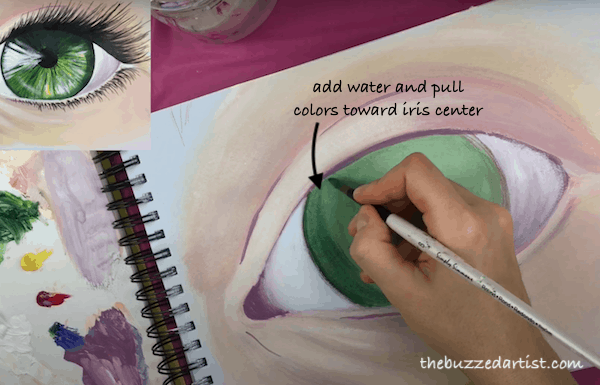
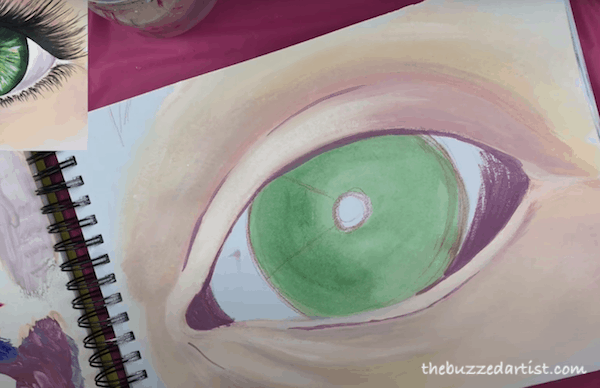
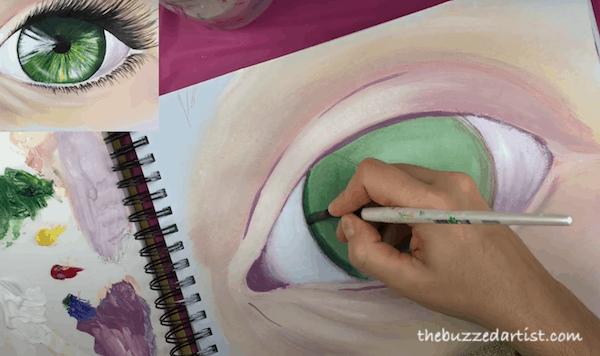
Step 8: Add Eye Color Highlights
With your rinsed flat wash brush, mix together yellow with a hint of green to create light tones. Starting at the center of the eye, place your brush broad side down and create straight lines going out to the iris edge. You don’t have to do too many of these but just enough to go full around the entire pupil.
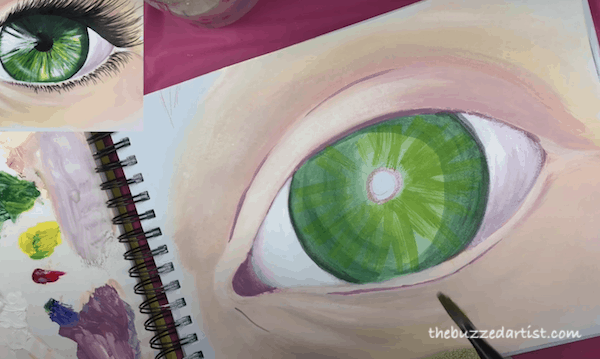
With your un-rinsed flat wash brush, grab more yellow, and repeat the same strokes as above to add more yellow highlights. You don’t have to go all around the eye or do too many strokes.
With your un-rinsed flat wash brush, grab white, and repeat the same strokes on the right portion of the eye.
Step 9: Add Eye Color Flecks
With your shader brush (or flat wash), load it with green and using just the tip, lightly paint thin lines emanating from the center of the iris to the iris edge. Vary the line heights for an added organic look.
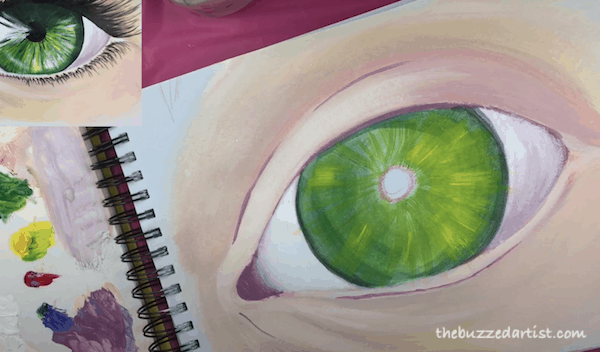
Step 10: Add Eye Highlights
With a flat wash brush, load with white and add a large white highlight to the upper left portion of the eye as well as the lower right portions.
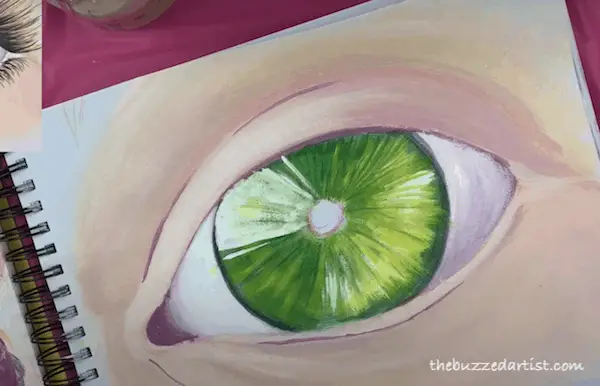
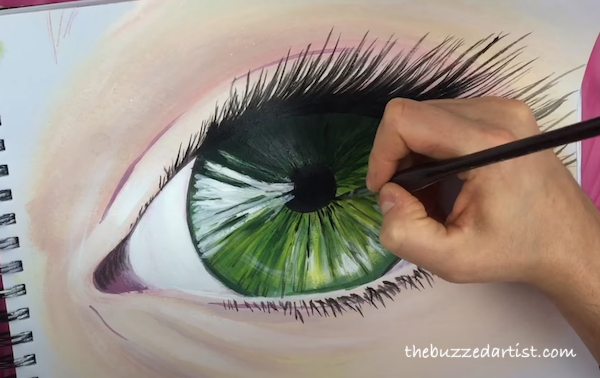
Step 11: Paint in the Pupil
With a small brush (detail round is my preference) dipped in water and loaded with black, paint in the pupil at the eye center.
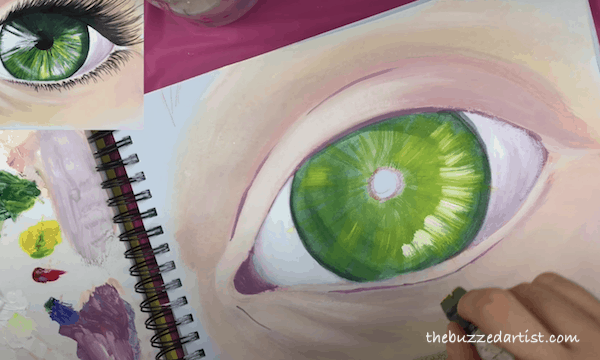
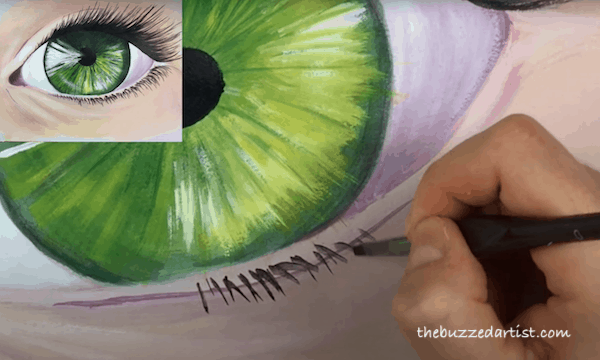
Step 12: Paint in the Top and Bottom Lashes
With the same brush and paint, proceed to paint the upper lashes. Begin by holding your brush at the edge of the eye where it meets the eye fold, and create a slightly curved line moving up. Release the brush pressure as you do so to help thin out the line. Create one full line of lashes, increasing and varying the overall lengths as it goes to the rightmost eye corner.

Proceed to add more layers of eye lashes, especially concentrating them towards the middle and rightmost areas of the lash line. Be patient and just have fun layer the lashes. For added realism, vary the length of each lash as well as slightly varying the directions.
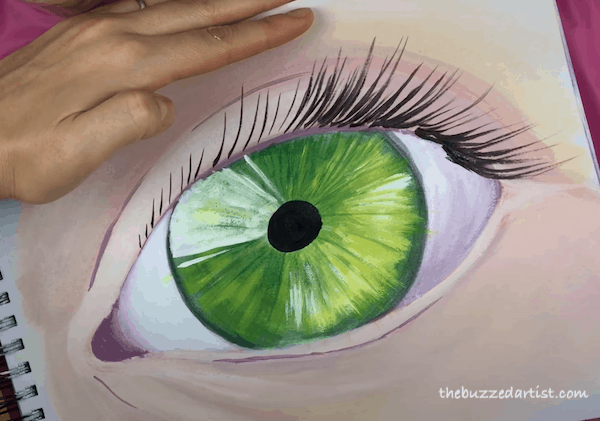
Add the lashes to the lower eyelid lash line. Starting toward the middle of the eye at the water line, create short curved strokes that point down, making sure to relieve pressure as you do so. Repeat this process as you add more lashes to the rightmost edge of the eye, making sure to increase the lash length as well.
Also, be sure to vary the orientations of the lashes to help create more realism.

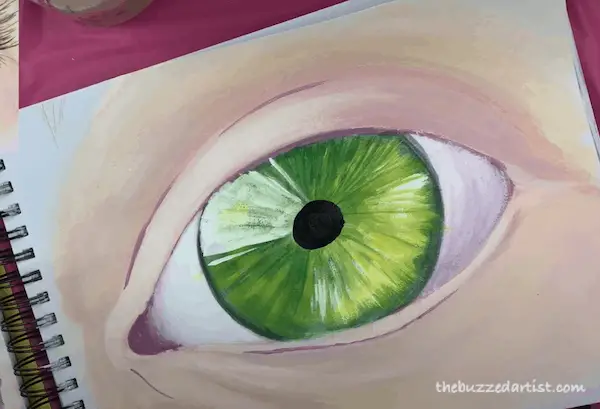
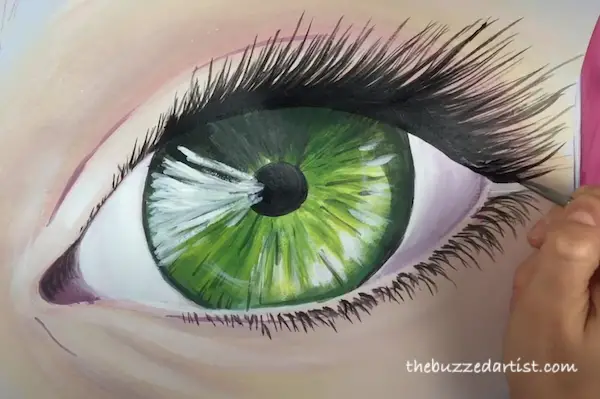
Step 13: Add more highlights at pupil and iris
With your rinsed detail brush loaded with white paint, lengthen the eye highlight to overlap the pupil as well as adding a few more white highlights to the rightmost portion of the eye.

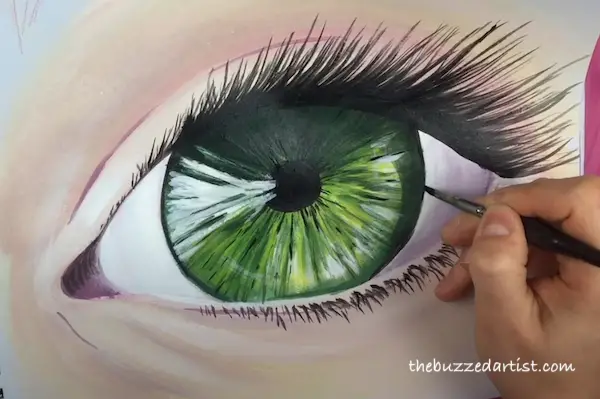
Step 14: Thicken lash line & layer on more lashes
With your rinsed detail brush loaded with black, thicken the lash line to create a more “heavier” looking mascara. You can also add more lashes at this point too.
Step 15: Paint in upper iris shadow
With your flat wash brush, load it with a mix of green and blue to create a darker green. Proceed to add a dark shadow on the upper portion of the iris (this helps imitate the shadow created from the upper eye fold.
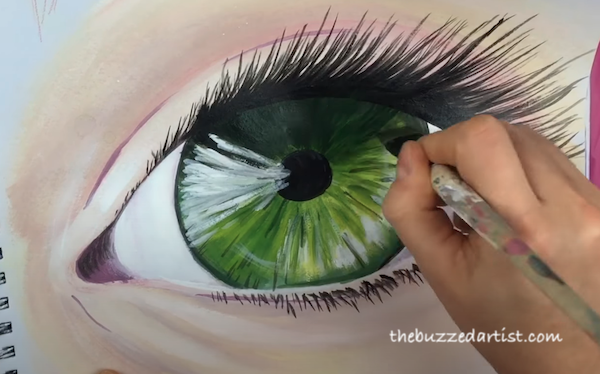
Step 16: Paint darker eye flecks
With a round or shader brush, use the same dark green color to add a few tiny lines going around the iris. Vary the lengths and starting points as you do this to create a more organic eye color specks.
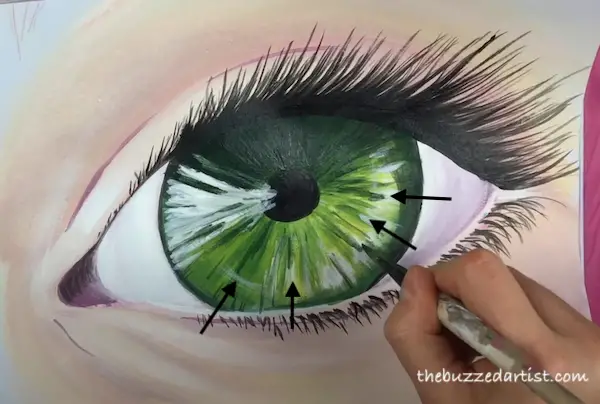
Repeat this with your detail brush and black paint for added contrast around the pupil. A little goes a long way.
Step 16: Paint dark outline around iris
With your detailed brush and a little bit of black, make a tiny outline around the entire circumference of the iris using very little pressure.
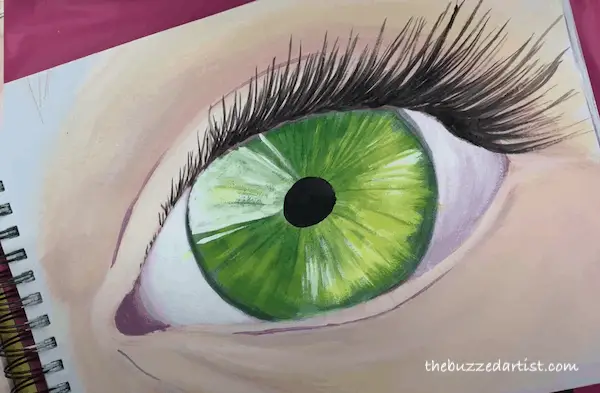
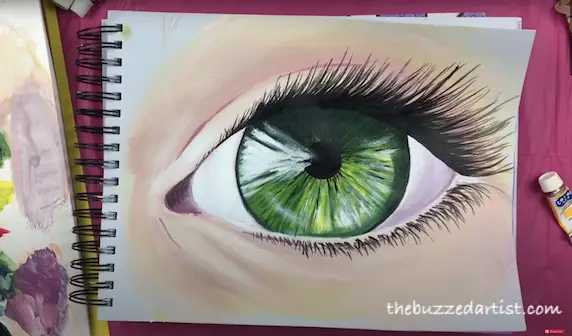
Step 17: Step back and admire your work, Queen
Once you’ve applied your finishing touches, you’ve got yourself a realistic eye painting that you can stare at (and with) adoringly for hours on end. Beauty is in the EYE of the beholder *wink wink*.
More Acrylic Painting Posts You Might Like
Acrylic Paint- Choose the Best Type for Your Next Painting
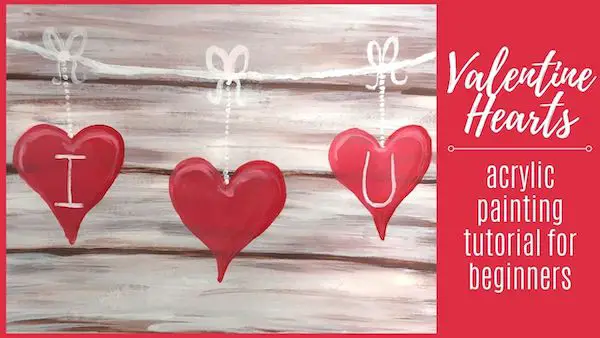
Valentine Hearts on a String – Acrylic Painting Tutorial