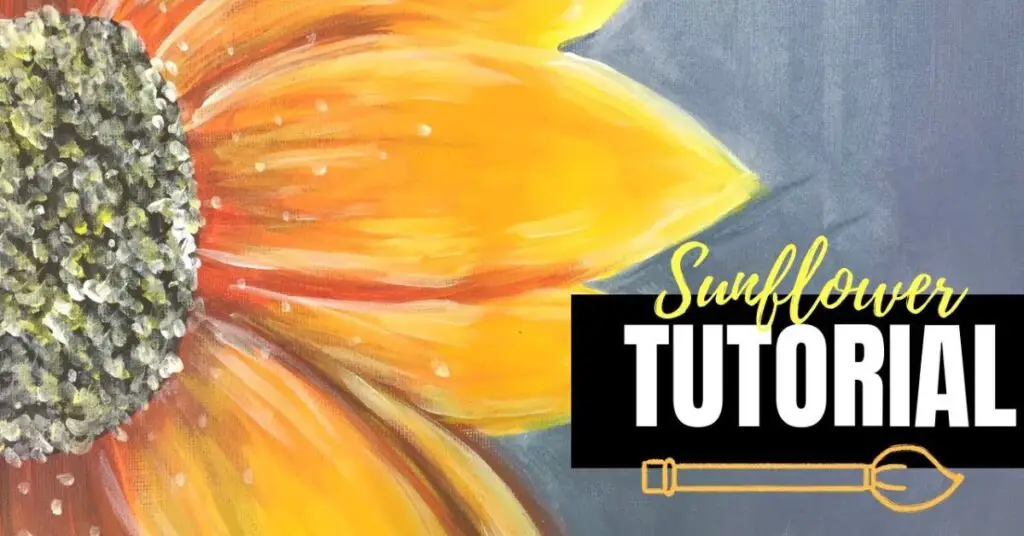
There are so many reasons why you should paint sunflowers. They’re cheerful, they’re gorgeous, and now they’ll also inspire you to get started with your own creative projects.
If you’ve ever felt intimidated by the idea of painting a sunflower, this tutorial will show you an easy way to create your own gorgeous piece of art. And you’ll see that painting beautiful sunflowers is lots of fun and an easy project for beginners.
So, in this step-by-step tutorial, learn how to create your own cheerful yellow sunflower painting with acrylic paints using simple techniques. Grab your paint brushes and let’s get to it.
Pin it for later! ⤵
Disclaimer: some links used in this post are affiliate links, which means I’ll earn a small commission if you purchase using my links at no extra cost to you. I only recommend products I think will be helpful to you and bring you one step closer to creating beautiful acrylic masterpieces!
👉 Want to host a paint party with this tutorial? Here is exactly how you can set up a fun DIY paint party at home.
SUNFLOWER PAINTING SUPPLIES
- 9″x12″ Canvas Paper* (taped to a sturdy surface)
- Tracing paper
- Charcoal pencil
- a reference photo
Brushes
Acrylic Colors Used:
Liquitex Basics? Use these colors:
If you prefer to use burnt umber or brown paint, that is perfectly fine. Simply use those colors in lieu of mixing as provided in the following steps.
SUNFLOWER PAINTING STEPS
Follow these step-by-step instructions on how to paint your very own colorful sunflower painting.
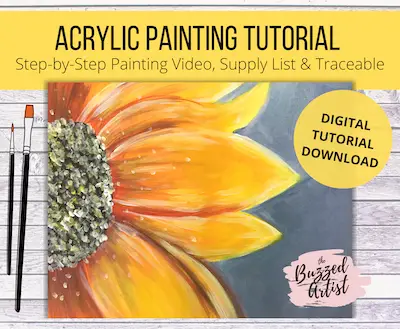
Want the Full Tutorial + Traceable stencil (with no ads)?
If you want to get the entire step-by-step painting tutorial (without ads), printable supply list and stencil for 3 standard canvas sizes, check out this painting printable here in my shop.
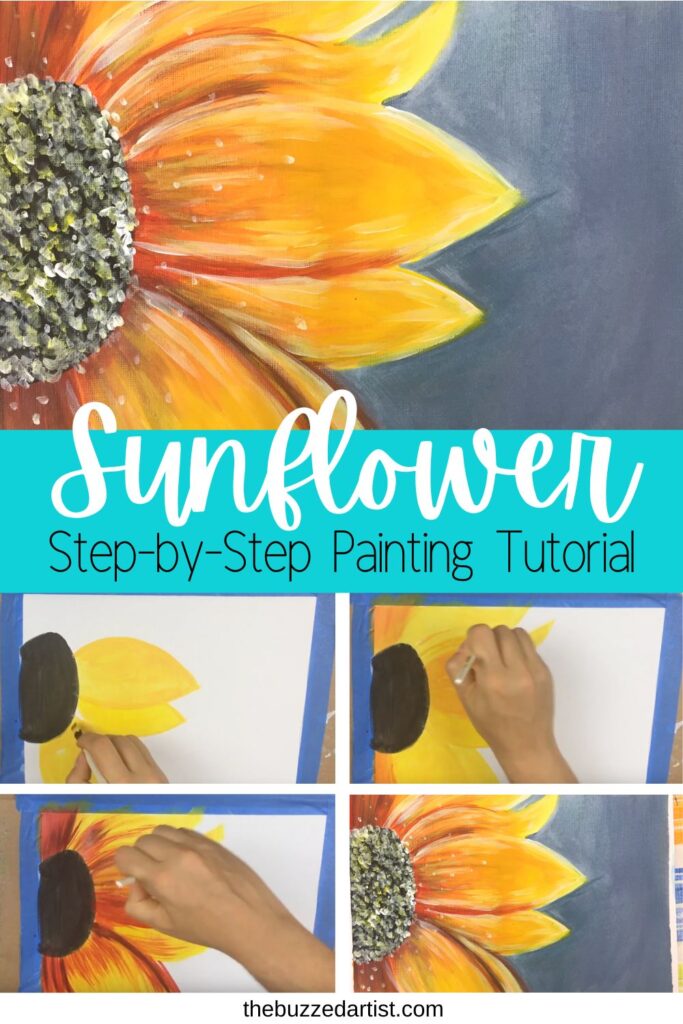
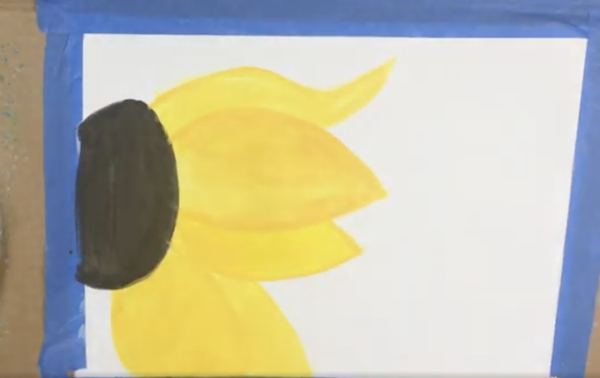
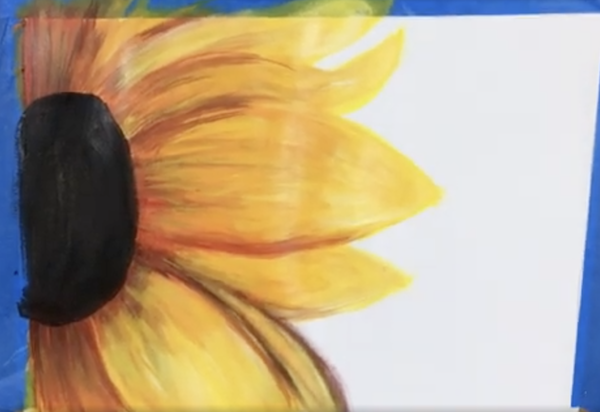
STEP 1: Using a filbert dipped in water and load it with black paint. Go to the left-most center edge of the canvas and create your flower pupil (aka the center of the sunflower). Start by making a backward “C” shape that is about 3-4″ wide. Proceed to fill in the remainder of the pupil.
STEP 2: Now it’s time to make the base color of the sunflower petals. With a flat brush, combine your yellow color with a tiny bit of red to create a bright yellow-orange paint mix. Begin by place the tip or flat edge of the brush an inch above the center edge of the pupil and make one large arc going left to right. End the arc at about halfway across the canvas.
To complete the petal, make another arc from the petal tip back to the flower center, ending it an inch from the middle of the pupil edge. Once the shape is complete, fill in the petal with color, following the shape of the petal with your brush strokes.
STEP 3: Continue creating the rest of the petals around the pupil using this exact same arc technique with the yellow hue. Be sure to vary the shape and length of each petal for added gorgeousness.
You can even add petals in between other petals by creating two arcs from the centers of adjacent petals and filling it in with color.
Want to use a stencil instead? Using your sunflower traceable, place and trace onto your canvas paper. If you need directions on how to do this, read this helpful post on transferring stencils to paper.
STEP 4: With the same flat brush, go back to the yellow-orange mixture and add in a bit more red to create a dark yellow or orange paint.
Go to the bottom of your pupil and add in one petal pointing down. Repeat this by going to the top of the pupil and adding another petal pointing up.
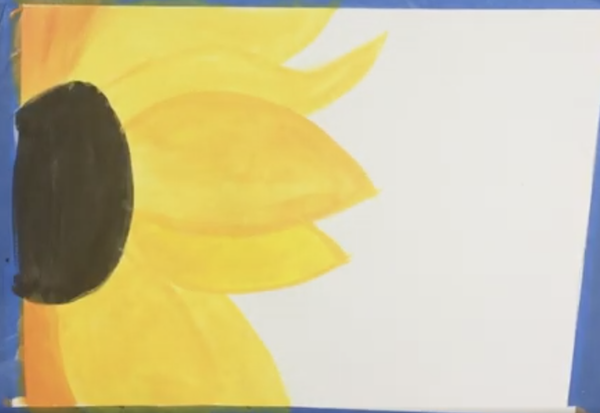
STEP 5: Once you’ve added all your petals, use the same brush and color to add depth to the remainder of your petals.
Using the sides and tip of the brush, lightly add brush strokes starting from the pupil and work out to the petal tip, being sure to follow the shape of the petal.
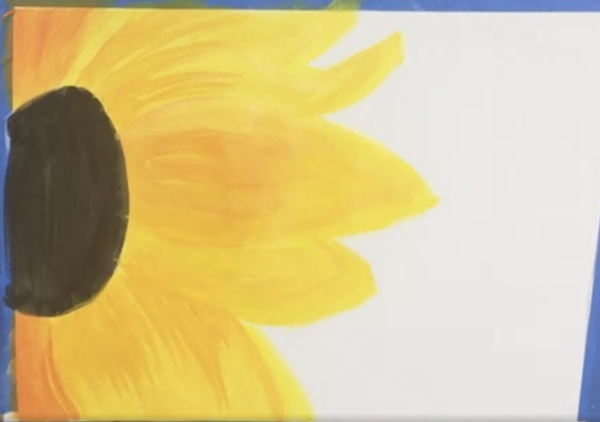
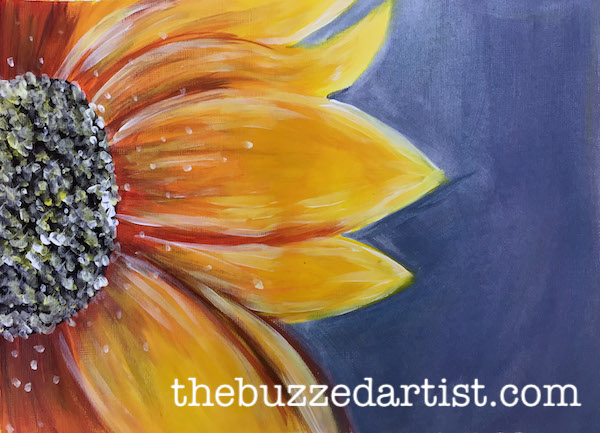
STEP 6: With the same flat brush, mix in yellow, red, and a tiny bit of blue to create a maroon color (close to a brown shade). Then using the tip of your brush, start at the top-most petal and place the color starting at the border of each sunflower petal – to help give it the petal shape. Repeat with the bottom-most petal as well.
Then, using a feathering motion (aka light pressure on your brush), bring your brush to the edge where the petal meets the pupil and lightly brush the color onto each petal.
STEP 7: With the same color, add a bit more blue to create a deeper, darker color of maroon. Repeat the same steps of lightly feathering the color onto the petals to help create different shades of color and depth.
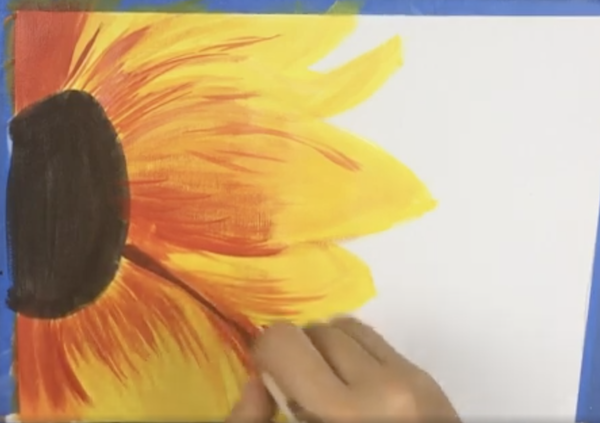
STEP 8: With your flat wash brush, mix yellow, a tiny bit of red and white paint.
Load the color onto your brush and begin blending the color onto each petal, making sure to follow the petal shape as you do so. Start about 1-2″ away from the pupil and blend out the color towards the petal tips. This will help soften the colors underneath and create a smoother looking blend.
STEP 9: Wait 5 minutes for your piece to dry. Then using your flat wash, mix the brightest yellow shade with a combo of yellow and white. Then load your brush and paint the color onto the middle and tips of each petal. Be sure to follow the shape of the petal with each stroke.
As a note: the more layers you add, you might begin to lose some of the contrast between each petal. Not to worry! All you need to do is mix red and yellow with a tiny bit of blue to make that maroon/deep orange color and reinforce those lines. Easy peasy.
STEP 10: Once you’re done applying your petal colors, it’s time to clean up the pupil. Using your filbert brush loaded with black, clean up the edges of your pupil- I decided to make mine even bigger too. Totally up to you.
Step 11: Now it’s time to paint the background. Of course, if you prefer the white background, then you can skip this step. But, I wanted to give my sunflower a bit more contrast with a painted background. Mix in a bit of blue and red with a little white to create a lavender color. Using your cleaned flat wash brush, proceed to paint in the surrounding areas of the canvas to create the background. This will help your petals to stand out.
Step 12: It’s finally time for the finishing touches. With a detail round brush (basically the smallest brush you got) dipped in white, begin to add lots of little dots inside the pupil. The more you add, the better and fuller your pupil will look.

Repeat this same step with your detail brush loaded with white and yellow as well.
Step 13: With the same detail brush, add some white highlights onto each of the petal edges. A few additional lines inside the petal could also be a nice touch as well. Then, as the final step, add more white dots around the pupil creating a magical look to your sunflower.
Step 14: Step back and admire how cool your painting looks. Back up, Van Gogh. This easy sunflower is blowing everyone out of the water.
This sunflower painting is a fun project any newbie artist will absolutely love and enjoy. The color layering creates a cool effect of the petals and gives your painting a quality that rivals that of a professional artist.
Want the Full Tutorial + Traceable stencil (with no ads)?
If you want to get the entire step-by-step painting tutorial (without ads), printable supply list and stencil for 3 standard canvas sizes, check out this painting printable here in my shop.