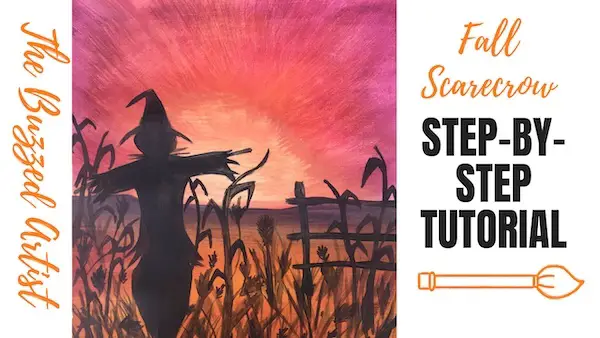
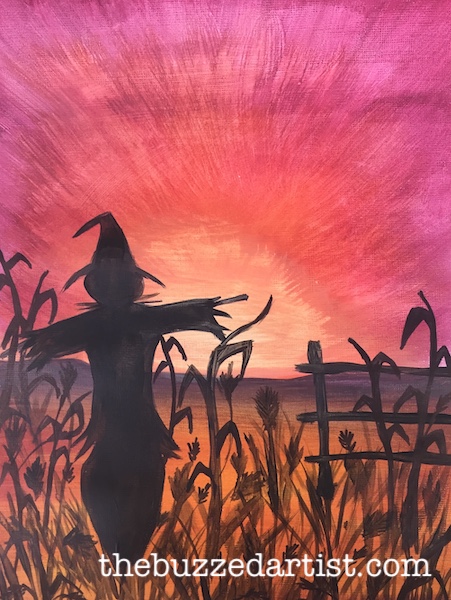
When you hear the word “scarecrow” you might immediately think of that straw-filled dude chilling in a cornfield with arms outstretched, symbolizing readiness and abundance for the upcoming harvest.
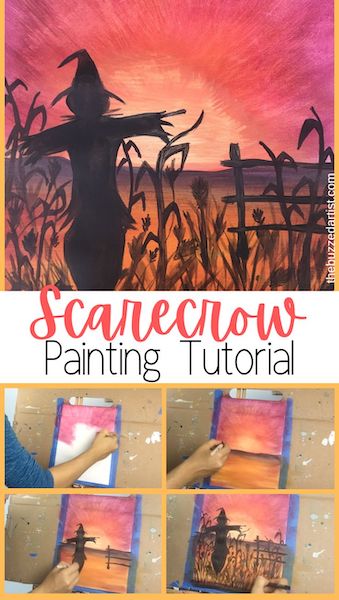
In this easy tutorial post, we’ll be painting a scarecrow in a cornfield watching the colorful setting sun – it’s the perfect scene that’ll bring a spark of whimsy and nostalgic fall colors to your home. Moreover, this tutorial is perfect for artists who love painting fall-related stuff and want to learn some new techniques in the process.
Follow these step-by-step painting tutorial and you’ll have your scarecrow ready to stand guard in no time!
Pin it for later! ⤵
Disclaimer: some links used in this post are affiliate links, which means I’ll earn a small commission if you purchase using my links at no extra cost to you. I only recommend products I think will be helpful to you and bring you one step closer to creating beautiful acrylic masterpieces!
👉 Want to host a paint party with this tutorial? Here is exactly how you can set up a fun DIY paint party at home.
FALL SCARECROW IN THE SUNSET PAINTING SUPPLIES
- 9″x12″ Canvas Paper* (taped to a sturdy surface) or 11″x14″ canvas, aligned vertically.
- Tracing paper (for transferring stencil)
- Charcoal pencil (for transferring stencil)
- Palette, palette paper or plate for mixing paint
- Sharpie marker
Brushes
Paints
- Mars Black Acrylic Paint
- Primary Red Acrylic Paint
- Primary Yellow Acrylic Paint
- Primary Blue Acrylic Paint
- Titanium White Acrylic Paint
- Acrylic Paint Basics
FALL SCARECROW IN THE SUNSET PAINTING STEPS
Follow these step-by-step instructions on how to paint your very own fall scarecrow staring at a sunset painting.
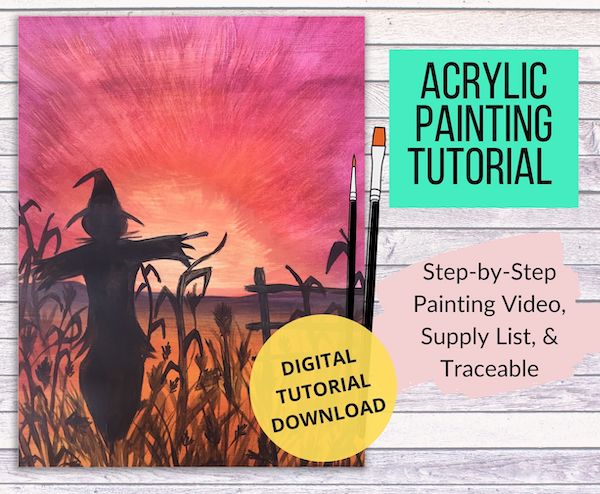
Want the Full Tutorial + Traceable stencil (with no ads)?
If you want to get the entire step-by-step painting tutorial (without ads), printable supply list and stencil for 3 standard canvas sizes, check out this painting printable here in my shop.
STEP 1: Using your flat wash brush, load it with white paint mixed with equal parts water. Begin to brush this onto your entire canvas, coating it completely.
Create the sunset sky background
STEP 2: Now it’s time to create that gorgeous sunset sky. Mix some red and a tiny bit of black to create a dark cranberry color. Load this color onto your washed flat wash brush and apply diagonal strokes starting at the top left of the canvas all the way to top right of the canvas. I made sure to leave the center unpainted and have all the strokes sort of emanating from that center. Be sure to cover about 1/2 of your canvas area. Repeat as much as you like.
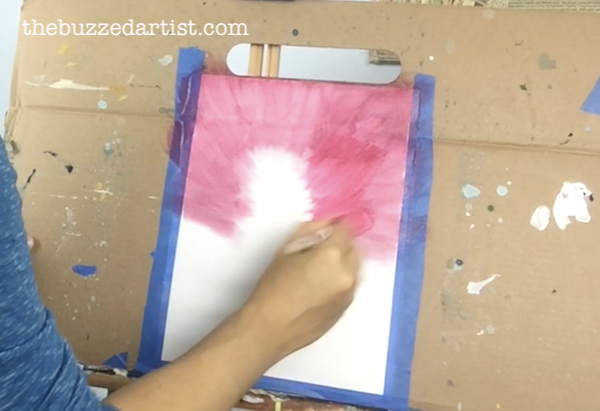
STEP 3: With your clean wash brush, load it with just red. Repeat the diagonal strokes onto the already painted portion, concentrating more towards the center of the canvas and emanating out.
STEP 4: With your clean wash brush, combine yellow with a bit of red to make orange. Going towards the center of the already painted portion, repeat the same diagonal brush strokes, making sure to fill in the center of the white portion as well. Be sure to blend out the color to create a nice blended sunset sky.
Paint in the setting sun
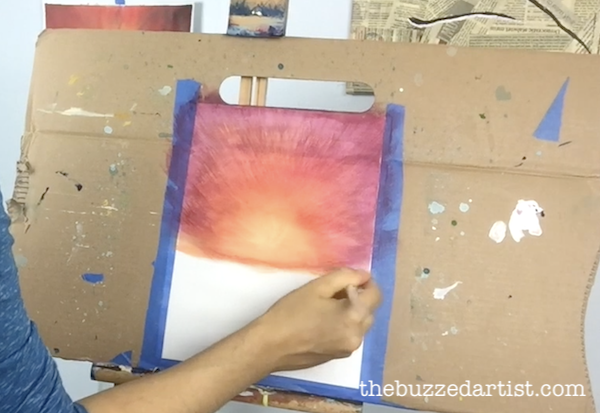
STEP 5: With your clean wash brush, grab equal parts white and yellow and going towards the center of your canvas (aka the center where all your colors converge), make light criss-cross brush strokes to add in the appearance of the sun. Once you’re done, let dry for 5 minutes.
Paint the field landscape
STEP 6: With your clean wash brush, grab red with a tiny bit of black to create a cranberry color. Go to the bottom half of your canvas and lightly brush the color onto the sides going towards the middle using horizontal strokes. No need to fill in the entire portion.
STEP 7: Load your wash brush with yellow and lightly apply the color onto the middle portion of the canvas using horizontal strokes, while also blending with the red from the previous layer.
STEP 8: Mix yellow and a bit of red to make orange and load in onto your wash brush. Lightly brush on the color onto the middle portion of your field.

Note: If you happen to lose some previous color layers, simply remix the colors and re-add it back in. In my case, I created that cranberry color (red + black) and lightly brushed it back onto the sides of the field landscape. It’s totally OK to go back and forth with your colors, making sure to blend and layer as you go.
Paint in the Mountains
STEP 9: With a clean wash brush, mix red with a bit of blue to create a violet color. Go to the point where the horizon line is (aka where the sky and land meet). Using the tip of your brush, create a horizontal line going from left to right. Once you’ve established your line, add a few bumps on various points of the line to create the look of a mountain.
STEP 10: With a clean wash brush that’s been really dried off (without any paint), go to the point where the mountains and landscape meet and lightly brush (or feather) over that area to create a more seamless blend.
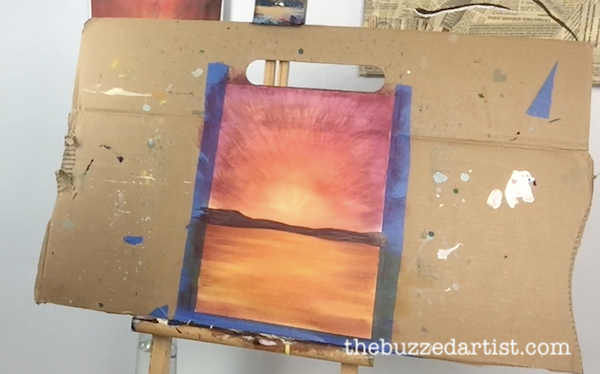
STEP 11: With your wash brush loaded with white, go back to the center of your sky where the sun is and lightly make criss-cross brush strokes to create a really light layer. Feel free to use your finger to smooth out the edges of the sun with the background.
Add in the scarecrow and fence
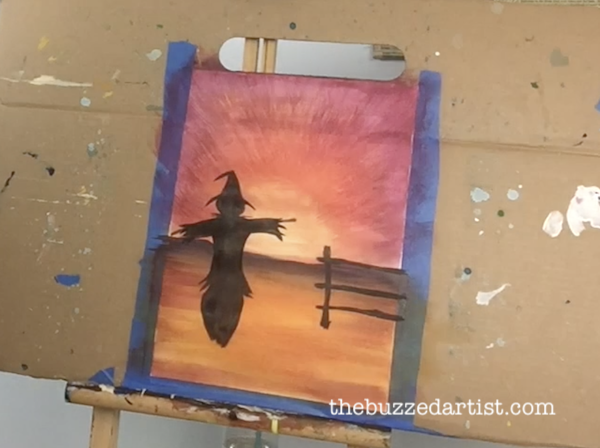
STEP 12: Using your scarecrow and fence traceable, place and trace onto your canvas paper. If you need directions on how to do this, read this helpful post on transferring stencils to paper.
STEP 13: Once transferred, fill in the fence and scarecrow with black using your flat brush or your detail brush (whichever makes you more comfortable)
Paint in the corn field
STEP 14: With your shader brush dipped in water and black, begin to add in corn stalks. Begin by using the tip of your brush aligned vertically. Create a line going from bottom to top and create a curve going left or right at the top. This is the main part of the corn stalk. Next, thicken the stalk a few times using the same strokes.
STEP 15: To add leaves, make an upside V that attaches to various points along the corn stalk. I added about 4 but you can add more or less if you desire.
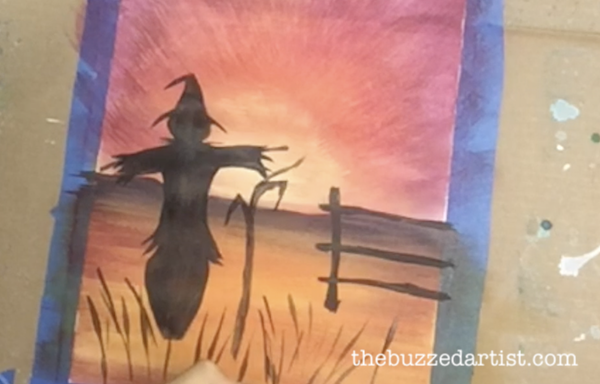
Paint in the Grass/Straw
STEP 16: Next comes the straw/grass. Using the tip of your shader brush dipped in watery black paint, lightly make a short line from bottom to top, making sure to release pressure at the top point of the straw. The more you can slightly slant those lines either left or right, the better. Proceed to add as much grass as you’d like.
STEP 17: Next add in more corn stalks using the same steps. You can keep on using a shader or detail brush or switch to a sharpie marker. I personally went the marker route because I can get more control and it’s generally much faster for me to handle. When making corn stalks, vary the heights and directions. Some of the ones I made are slightly taller and/or slant slightly right or left. This helps create a thicker looking corn field. Feel free to add them all around the scarecrow as well as along the fence area.
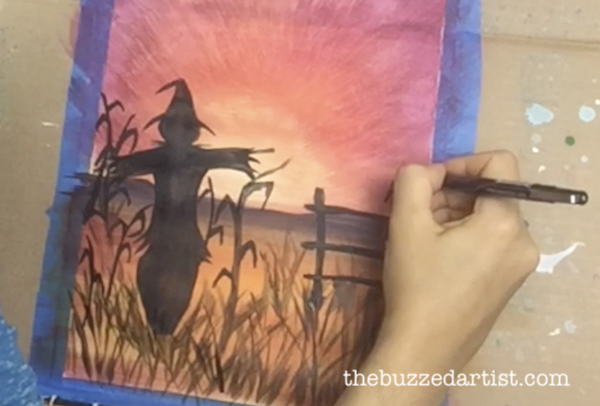
Paint in the Barley Tops
STEP 18: It’s time to add barley tops to some of the tips of the straw we painted earlier. With your shader black dipped in wet black (or just your sharpie with a finer tip), using the tip angled 45deg, create small side strokes going around the tips of the straw. I did this technique to make about 15 barley tops but you can adjust this to create less or more.
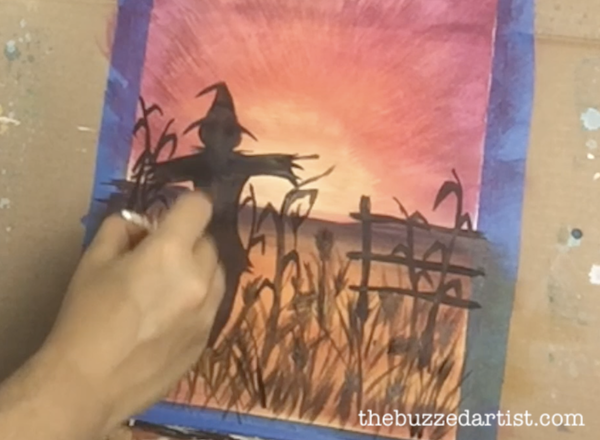
At this point, you can add in more corn stalks, straw, or other little details as you see fit. Once you’re finished, step back and admire your work.
More Halloween Canvas Painting Tutorials
- 30+ Fall & Halloween Canvas Painting Ideas
- Wicked Witch Painting Tutorial
- Chic Pumpkin Painting Tutorial